 Nederlands
  English (UK)
Below you will find the following manuals for "Pretty Slider":
- Installing Pretty Slider with the download
- Configuration of Pretty Slider
- Assign or adjust module position / page view Pretty Slider
- Update Pretty Slider
- Uninstall Pretty Slider
For your information:
- The manuals are written with Joomla 6.1 and Pretty Slider 1.1.0. Pretty Slider needs Joomla 5.4 or newer, and a template that loads Bootstrap 5, such as Cassiopeia. In Joomla 5 some screens can look slightly different.
- The red numbers in the images match the numbers between brackets in the steps.
- Click on an image to enlarge it. It opens in a pop-up window; click next to the window to return to this article.
- Please note: the module positions depend on your Joomla template and may therefore differ. More information: https://docs.joomla.org/Finding_module_positions_on_any_given_page
Installing Pretty Slider with the download
These steps download Pretty Slider and install it in Joomla by uploading the file.
- Download the Pretty Slider module from GitHub (free, no account needed):
Download Pretty Slider
Under Assets, click the ZIP file mod_prettyslider-1.1.0.zip (1). A newer version has a higher version number in its name. The file is downloaded. Do not unzip it, and remember where you saved it.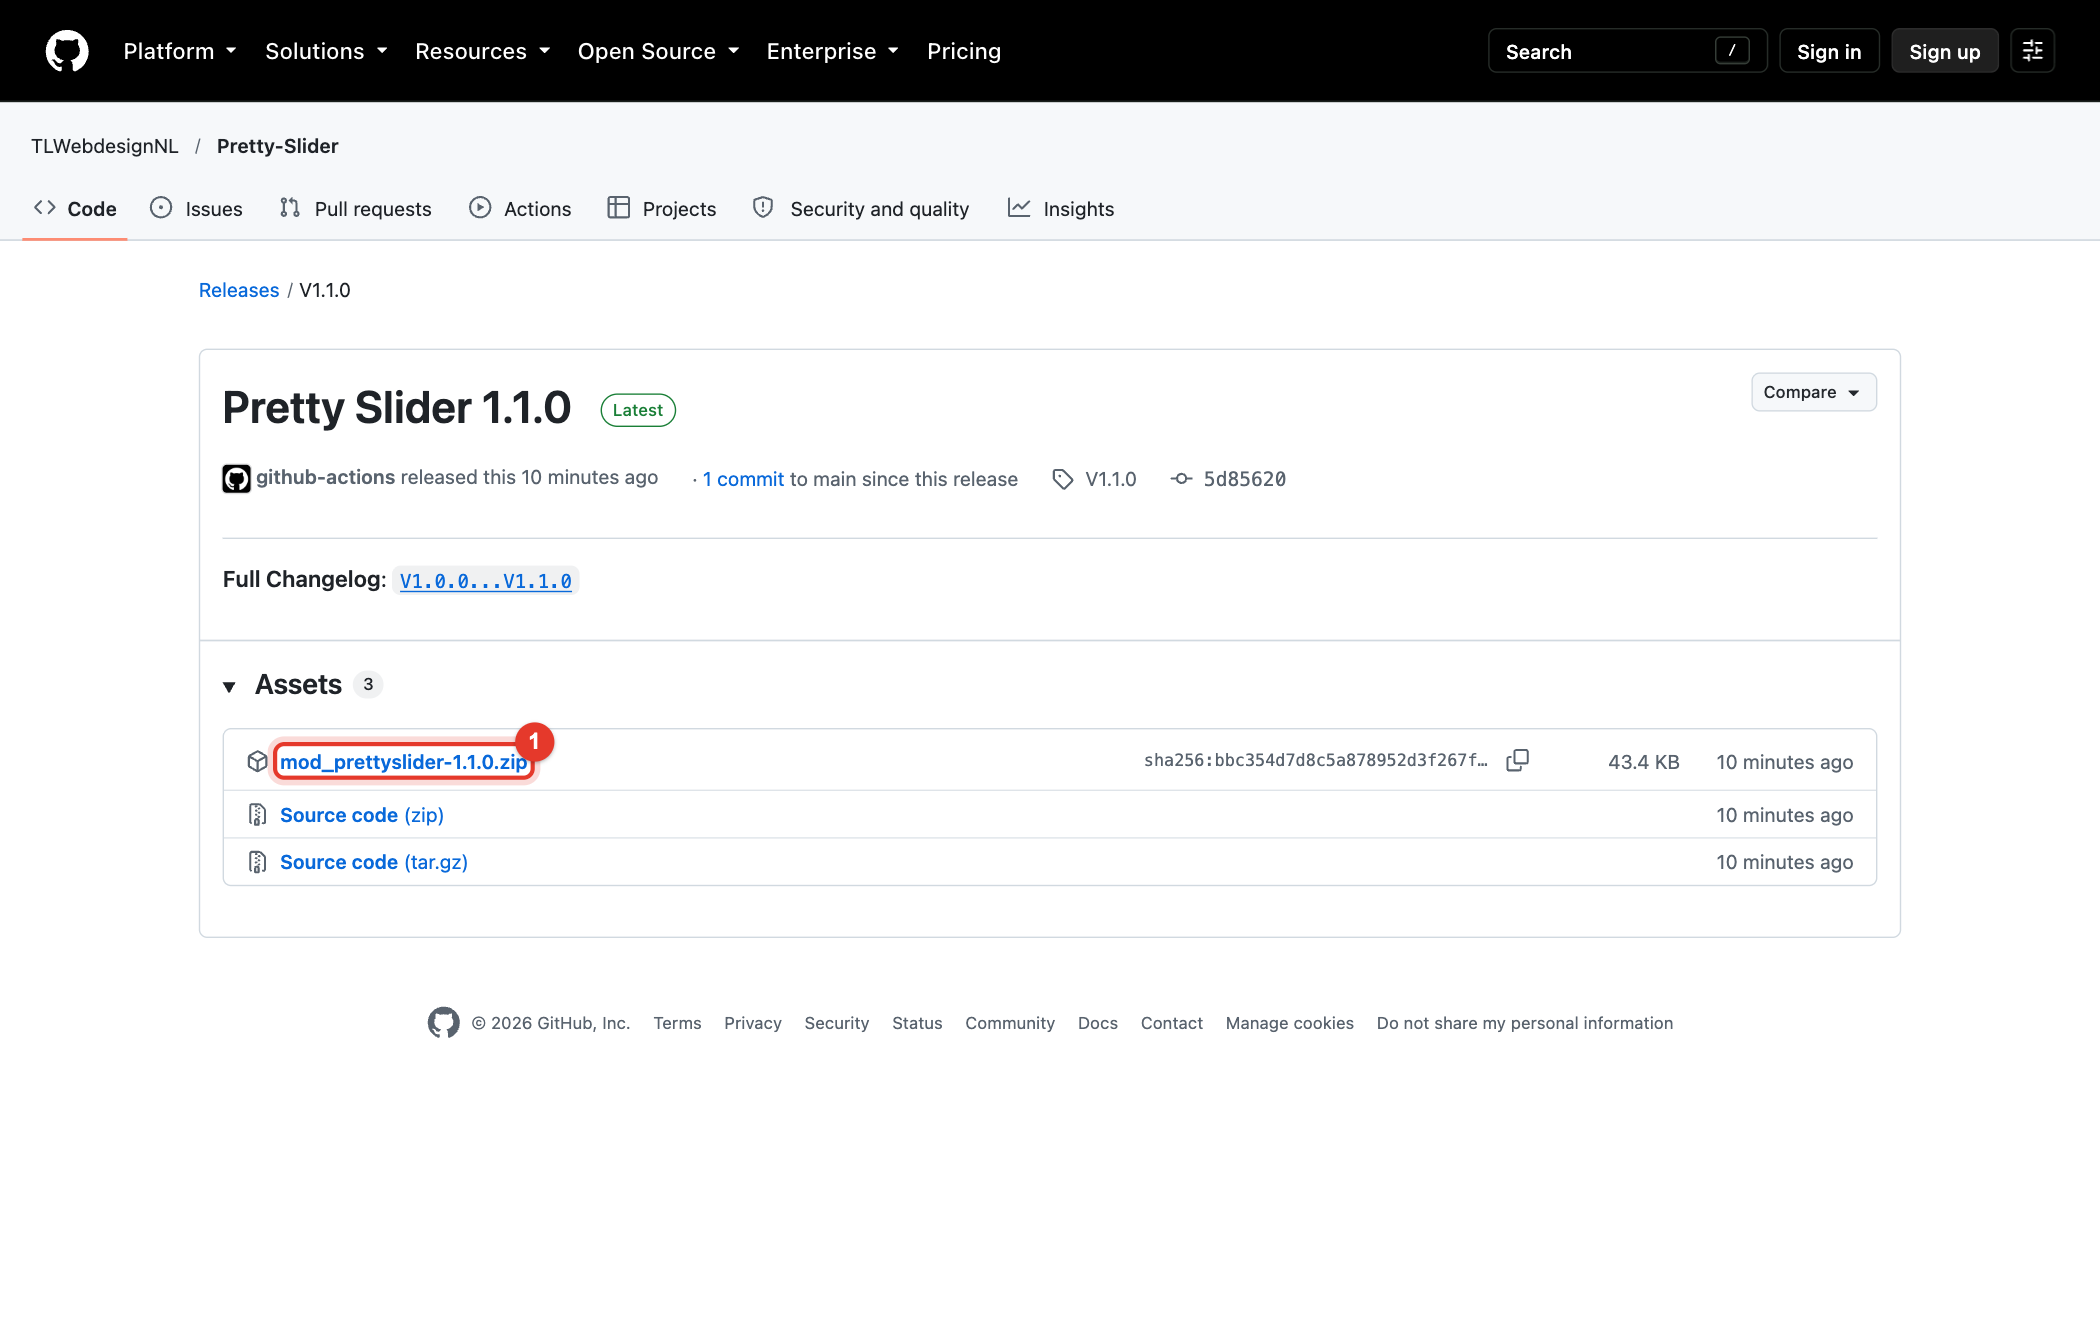
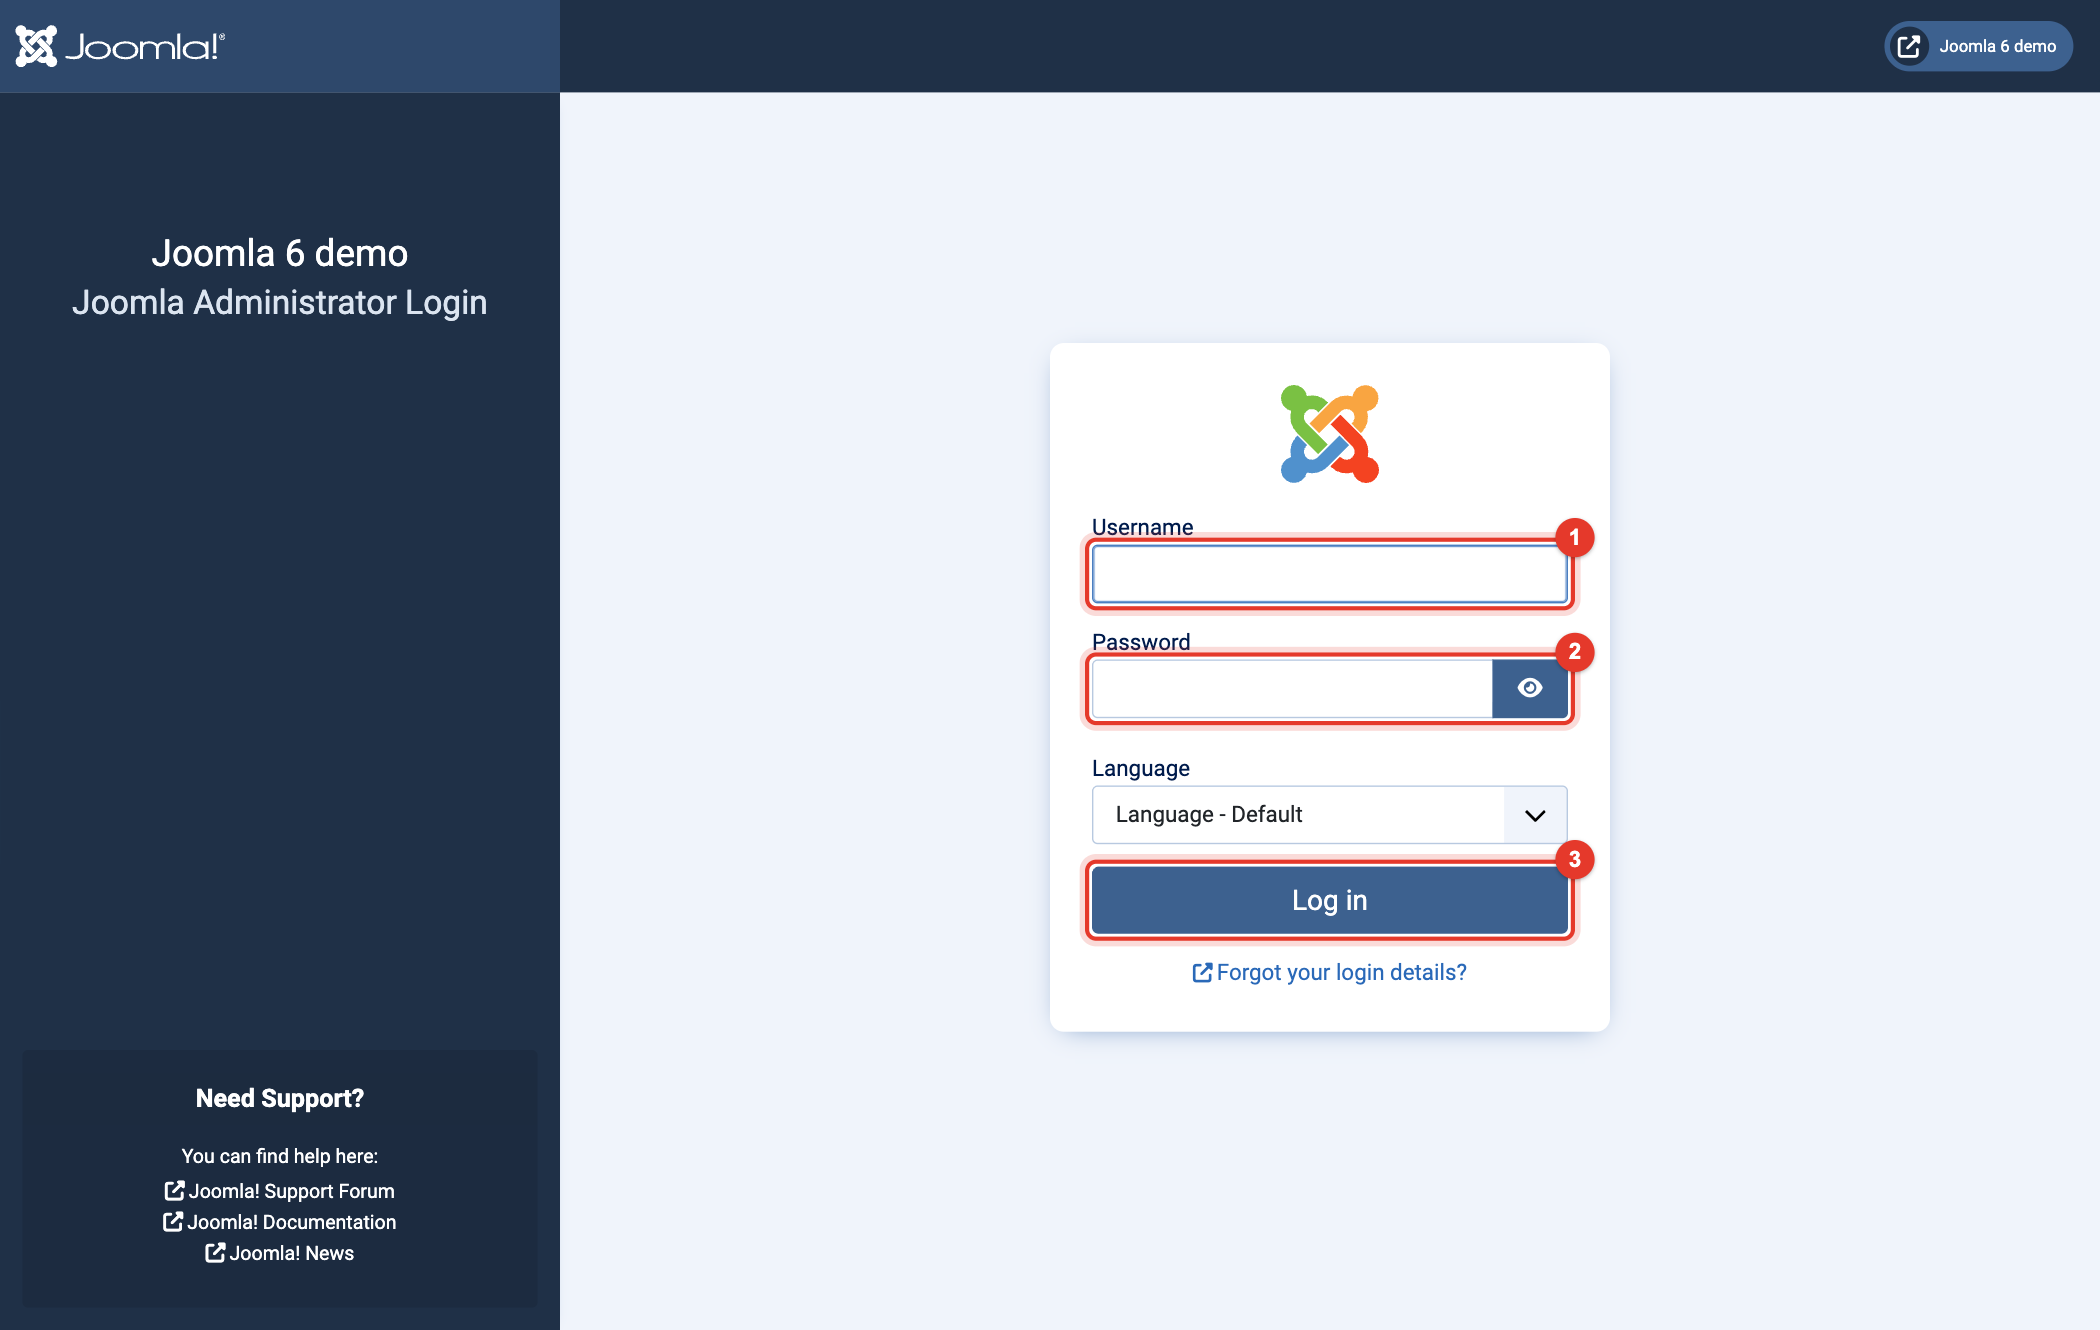
- Open the back-end (administrator) of Joomla, usually at https://<yourdomain>/administrator/. Enter your Username (1) and Password (2) of a Super User account and click Log in (3).
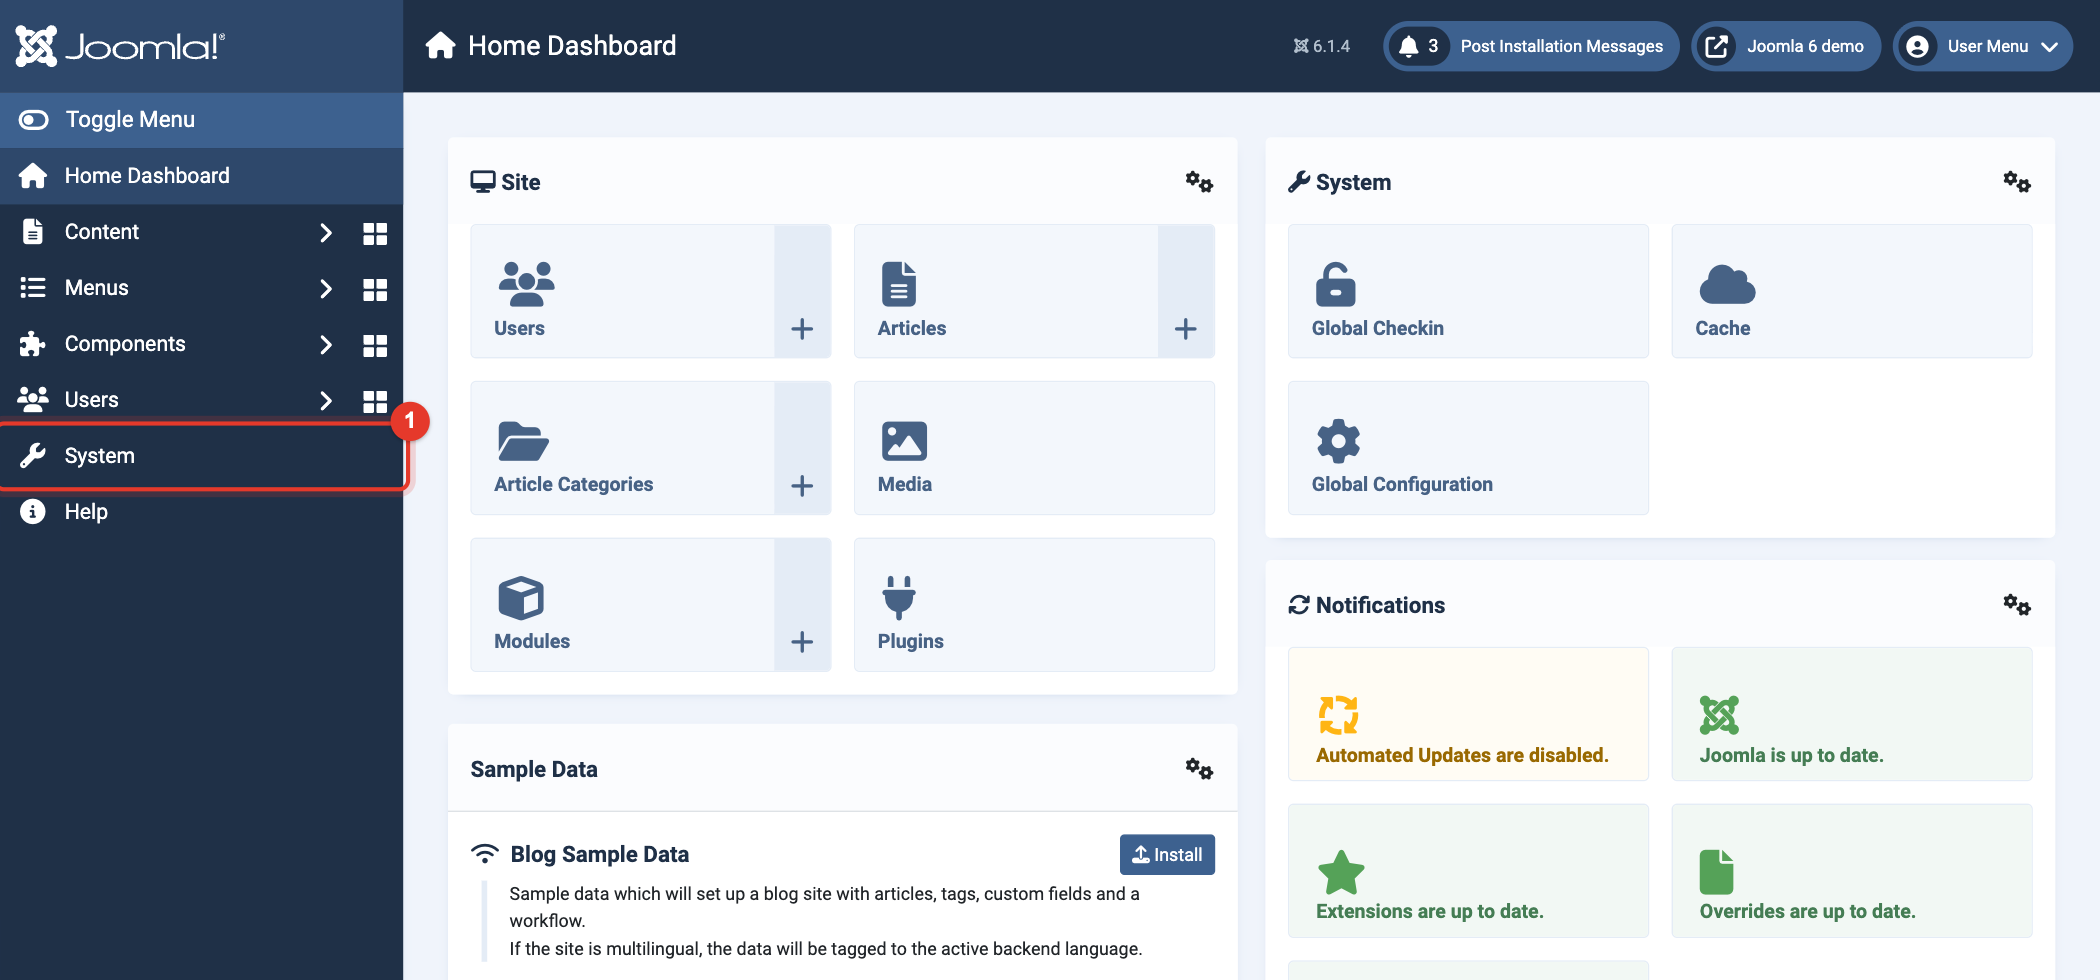
- In the menu on the left, click System (1).
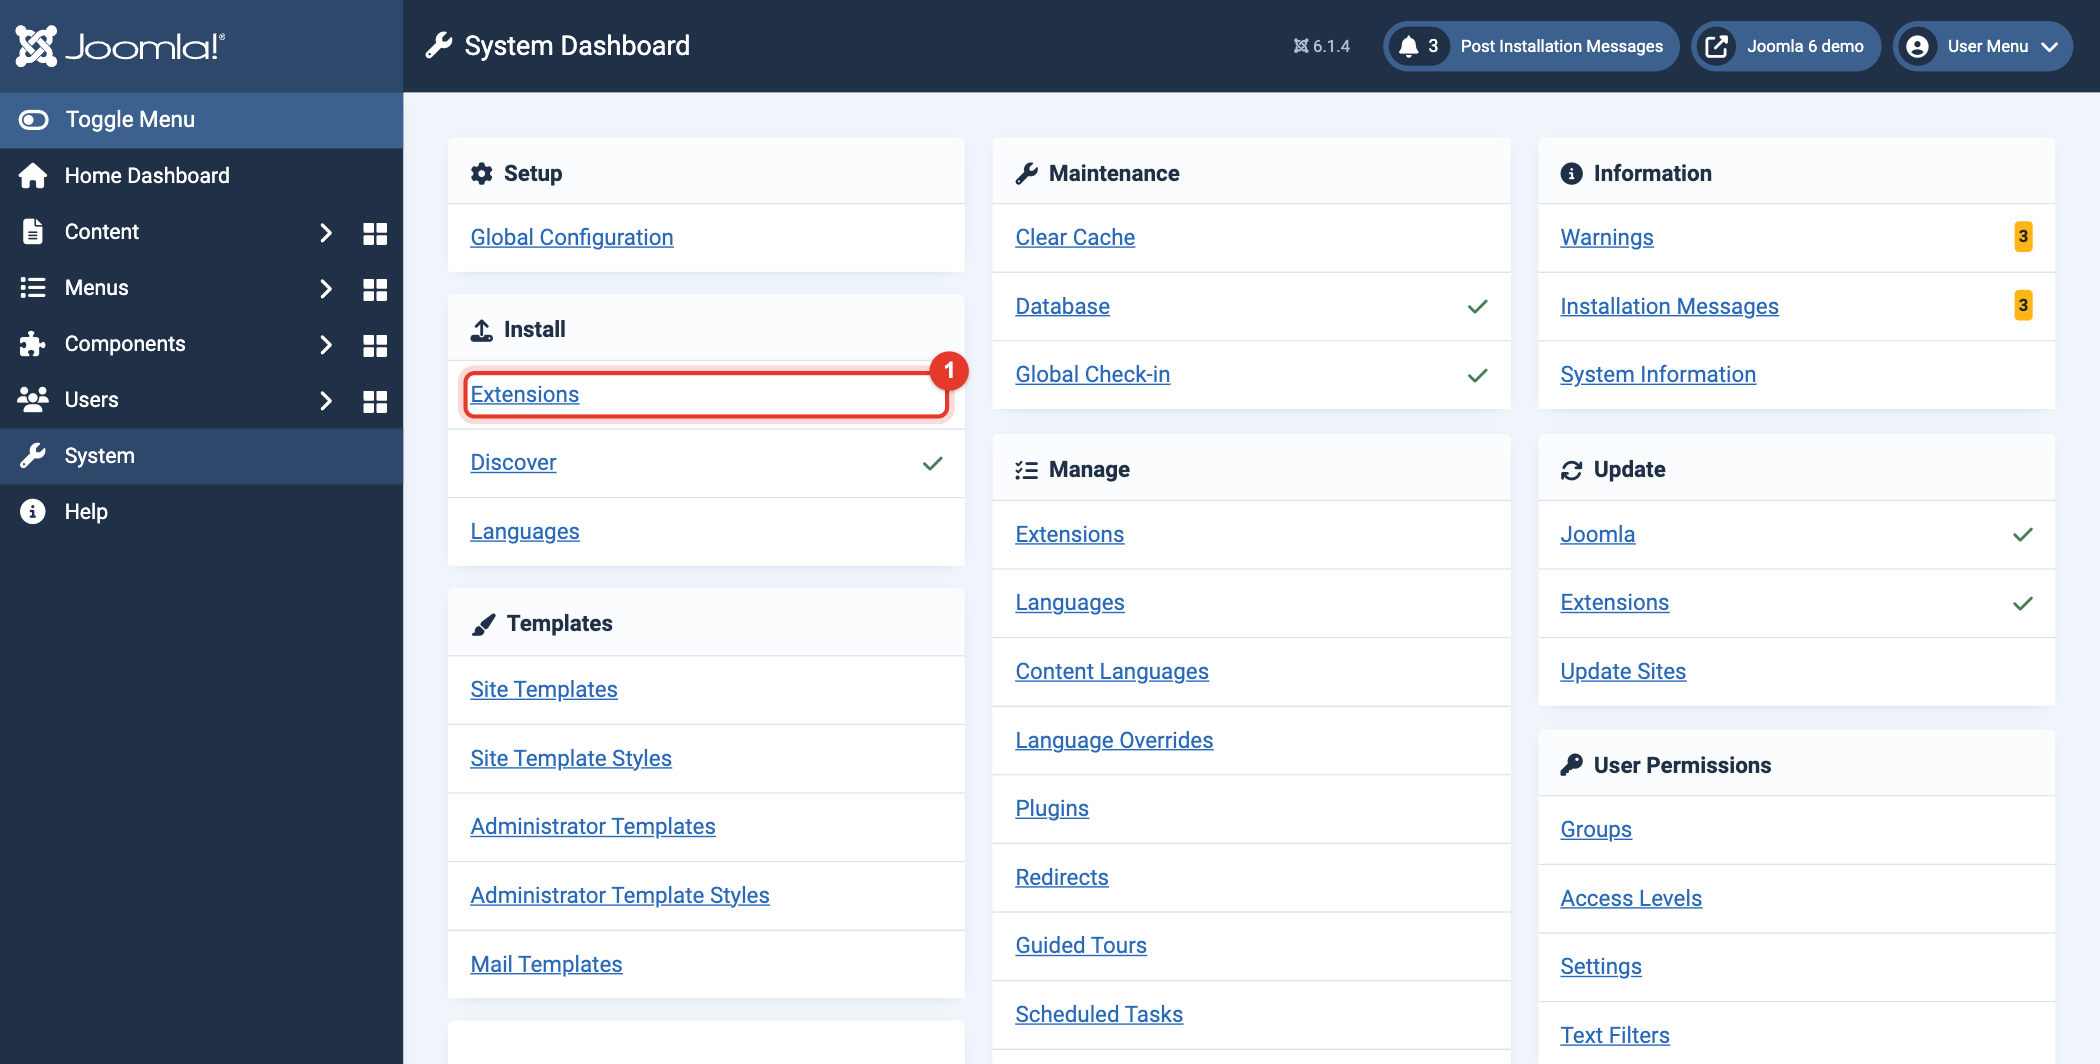
- In the block Install, click Extensions (1).
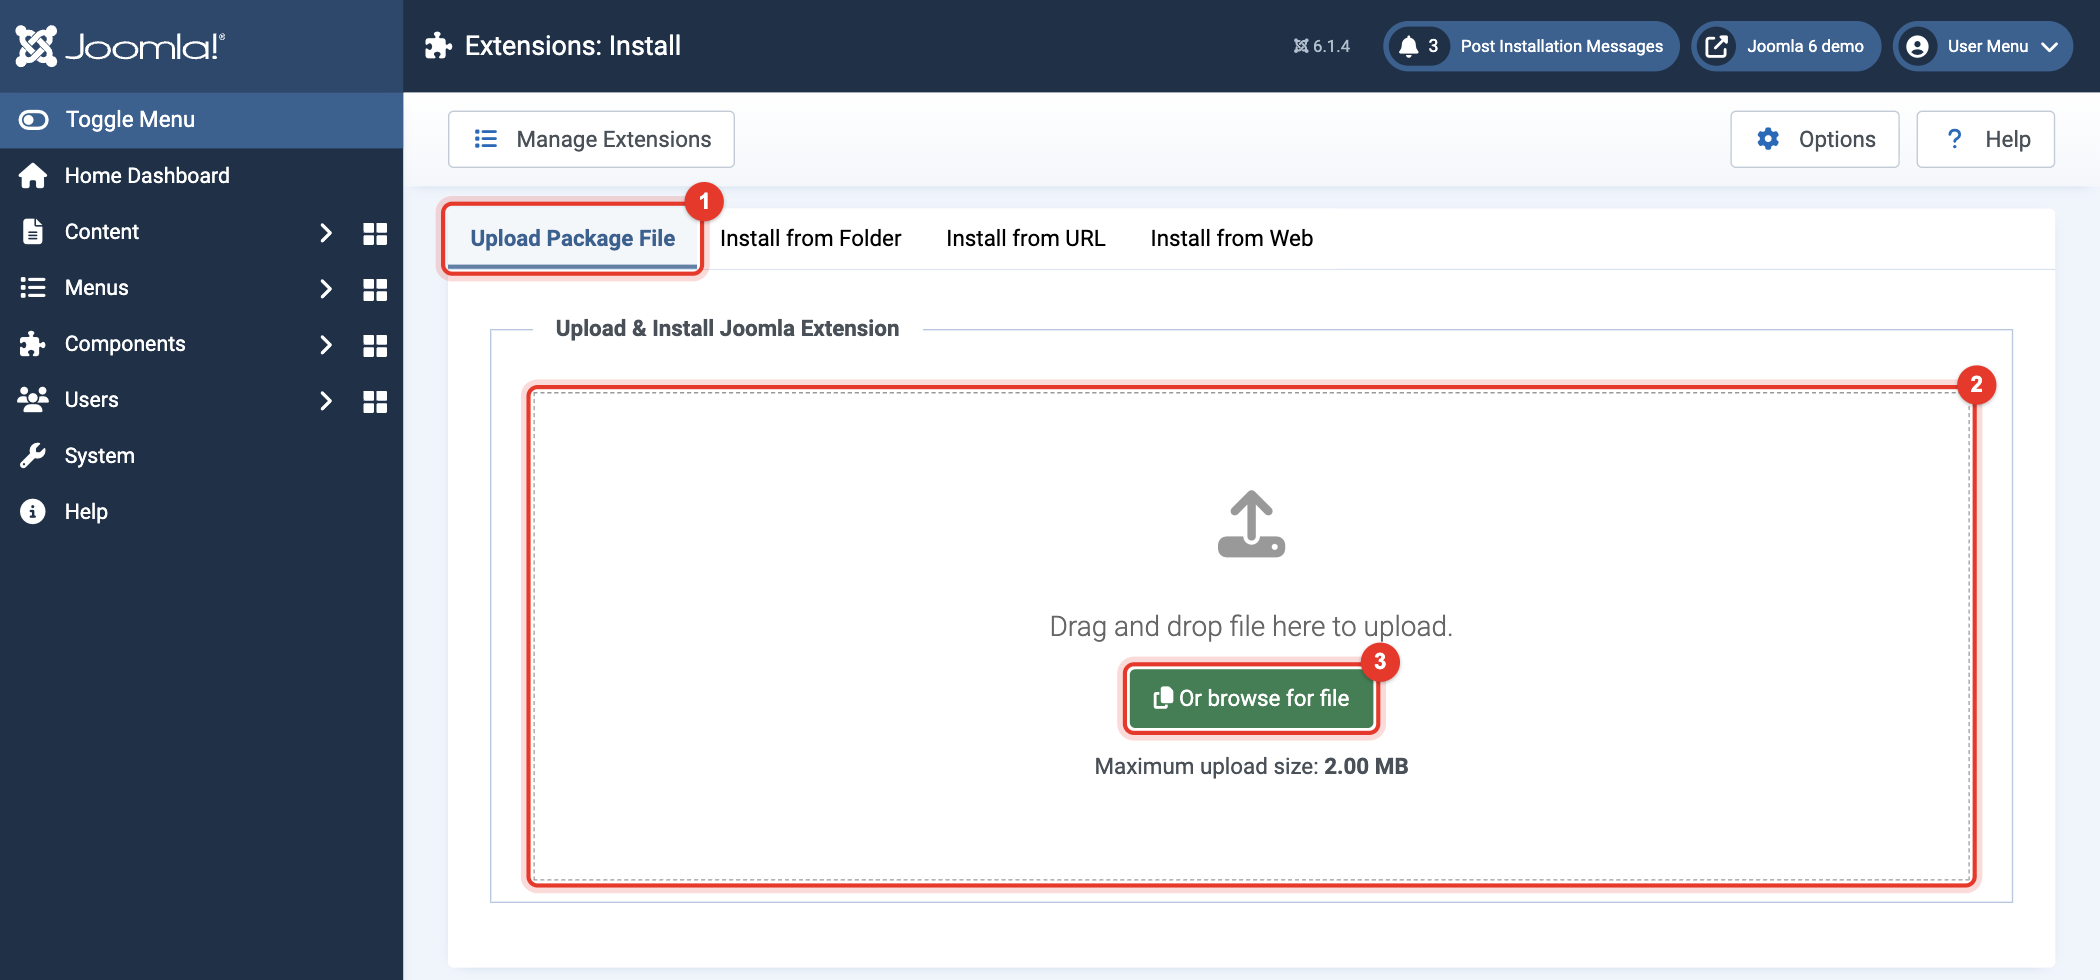
- The tab Upload Package File (1) is open. Drag the ZIP file into the frame (2), or click the green button Or browse for file (3), select the file and click Open.
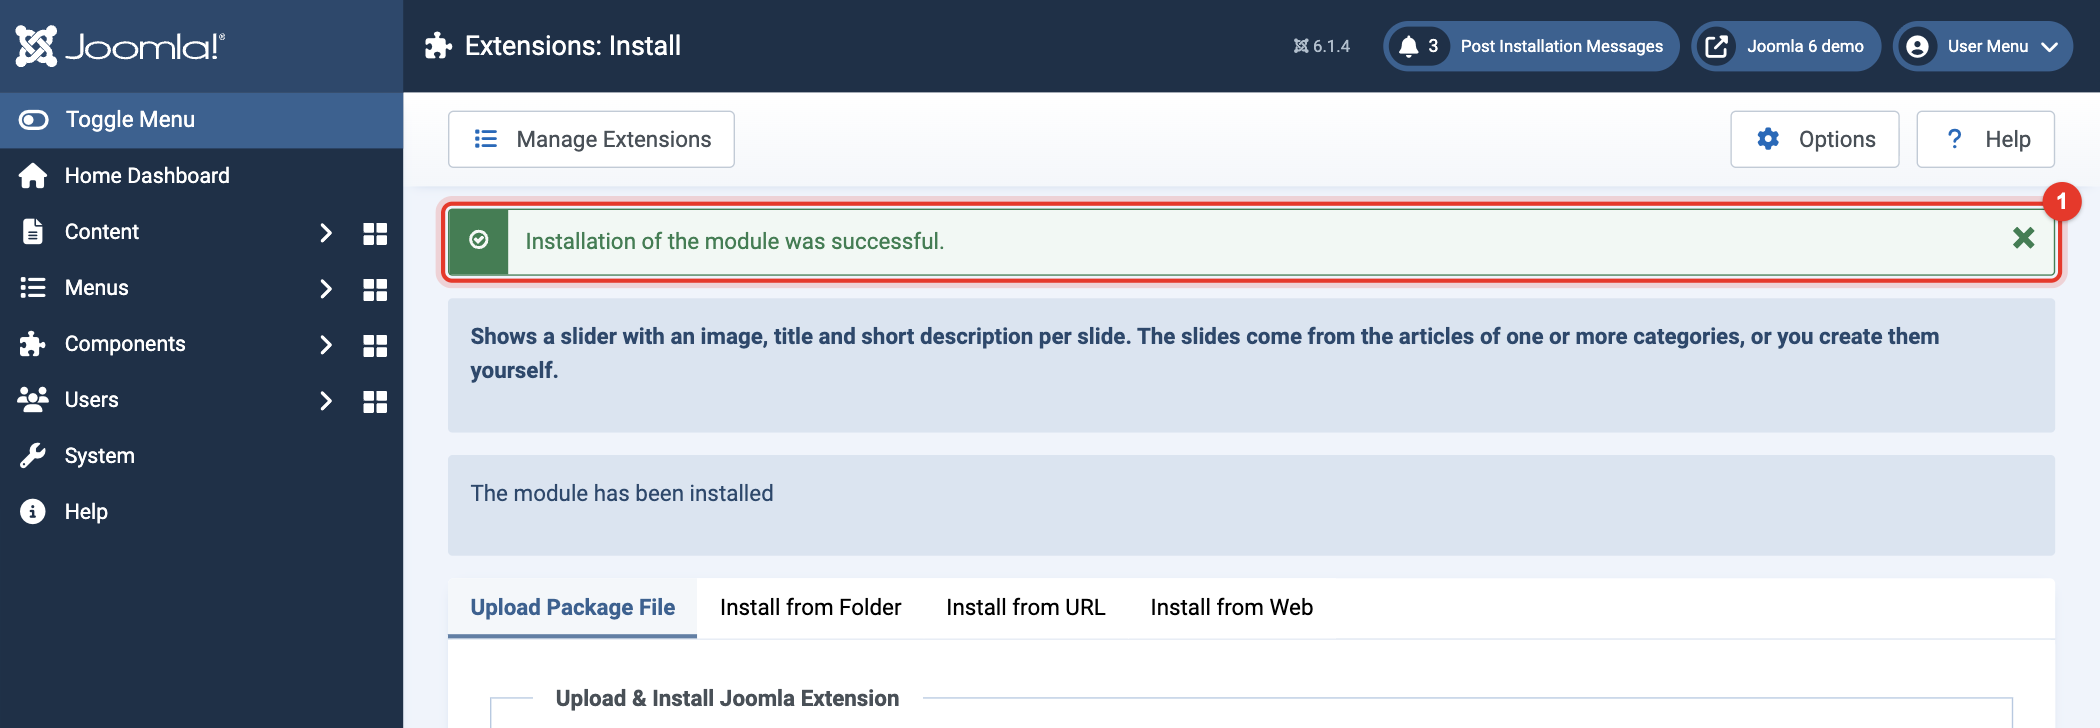
- The module is installed right away. The message "Installation of the module was successful." appears (1).
- You can now set up the module. See Configuration of Pretty Slider.
Configuration of Pretty Slider
These steps set up the module after you installed it with the manual above. The example makes a slider with three slides that we fill in ourselves.
- Log in to the back-end (administrator) of Joomla with a Super User account. You usually find it at https://<yourdomain>/administrator/. Then click System in the menu on the left, as in steps 2 and 3 of the first manual.
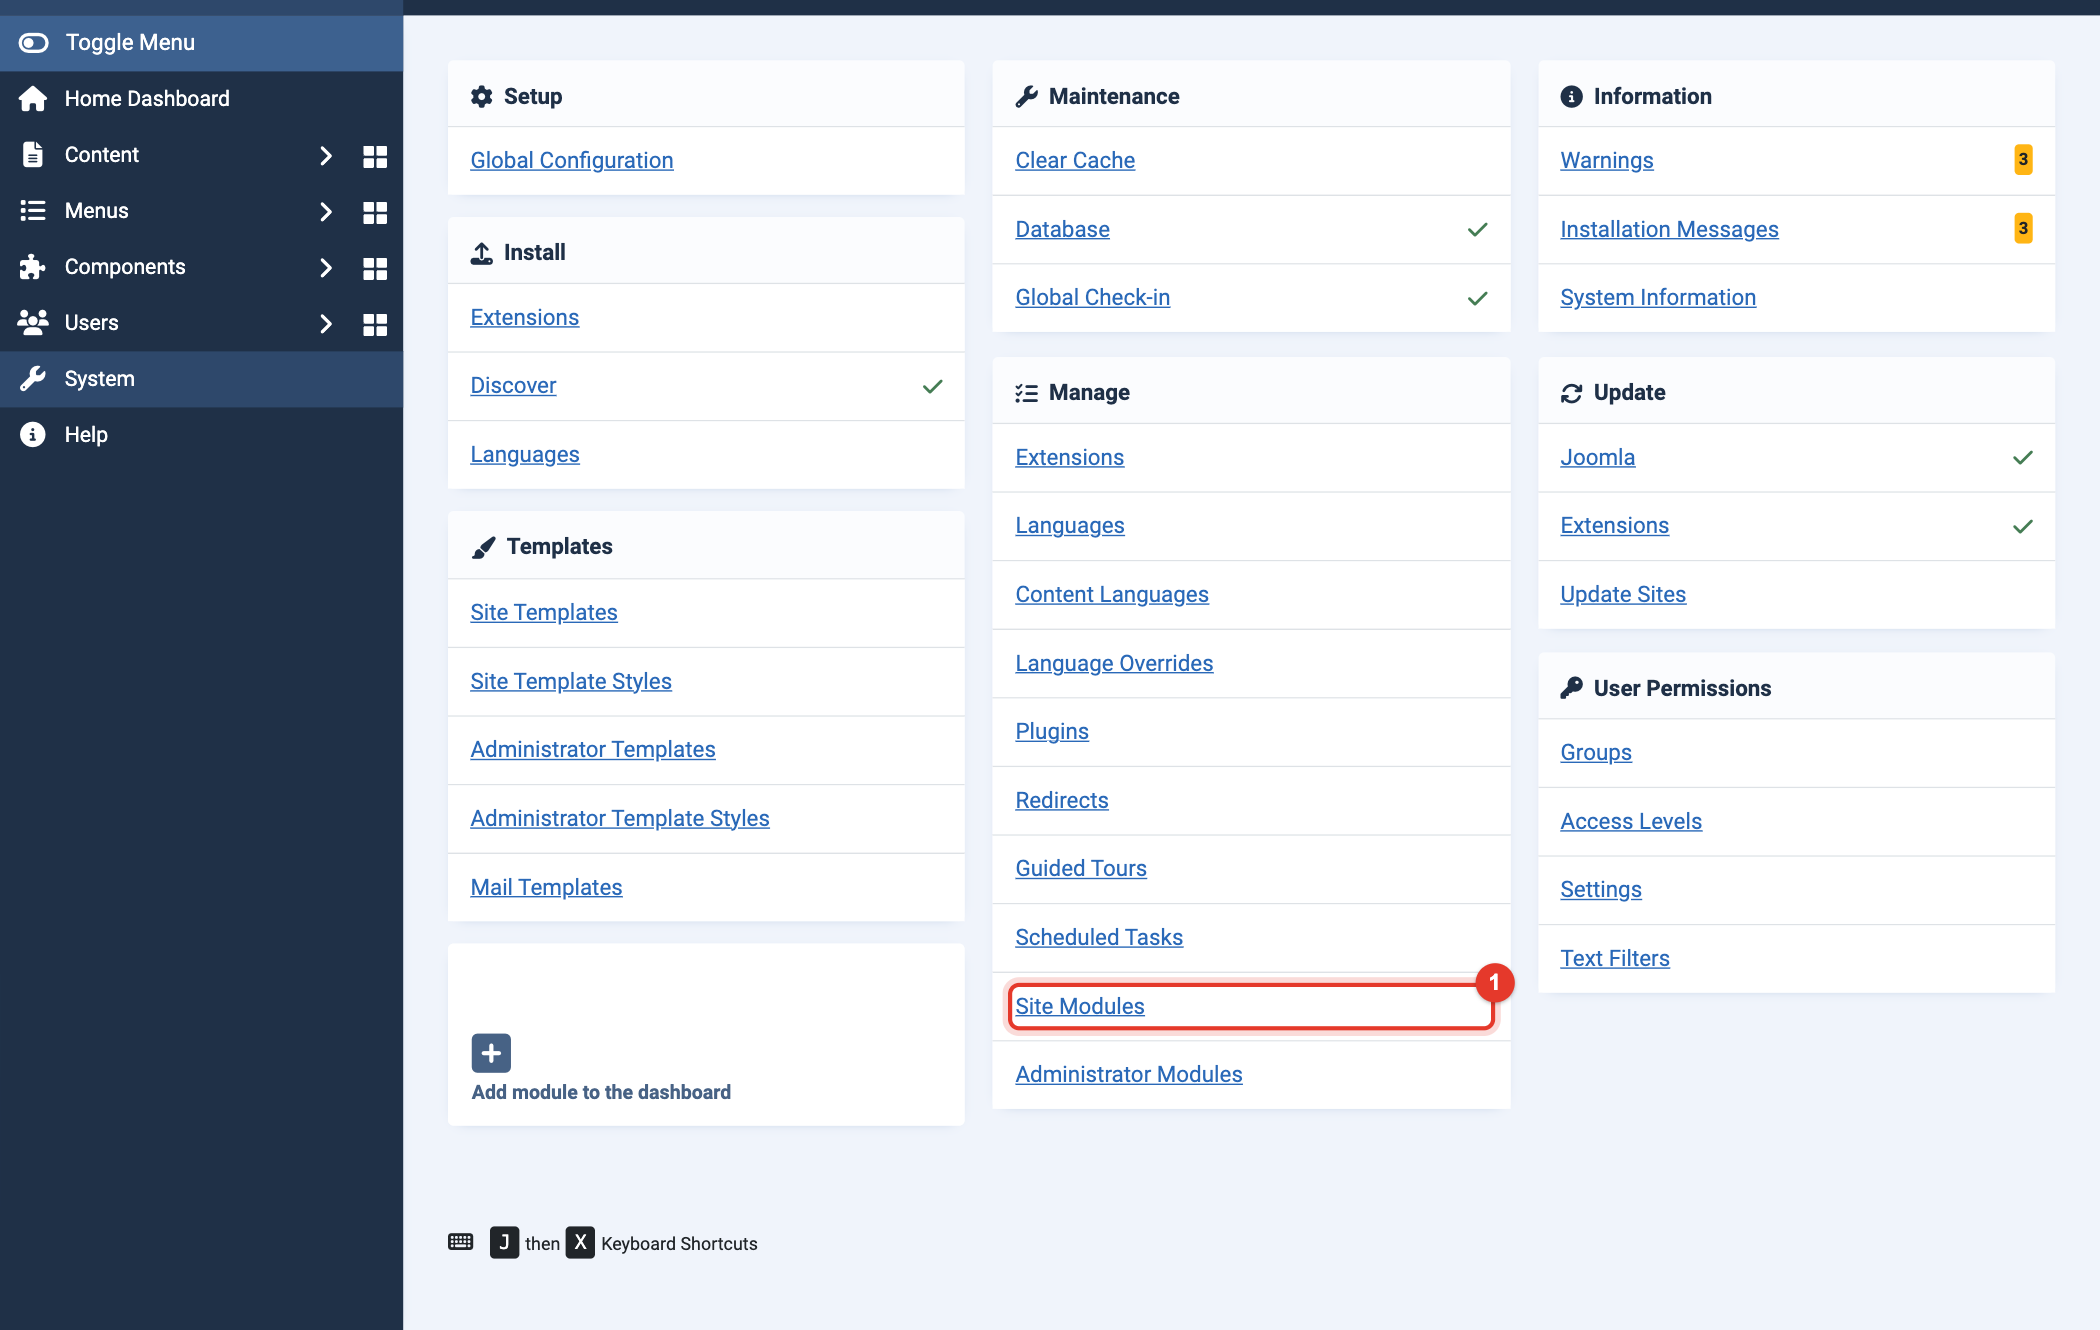
- In the block Manage, click Site Modules (1).
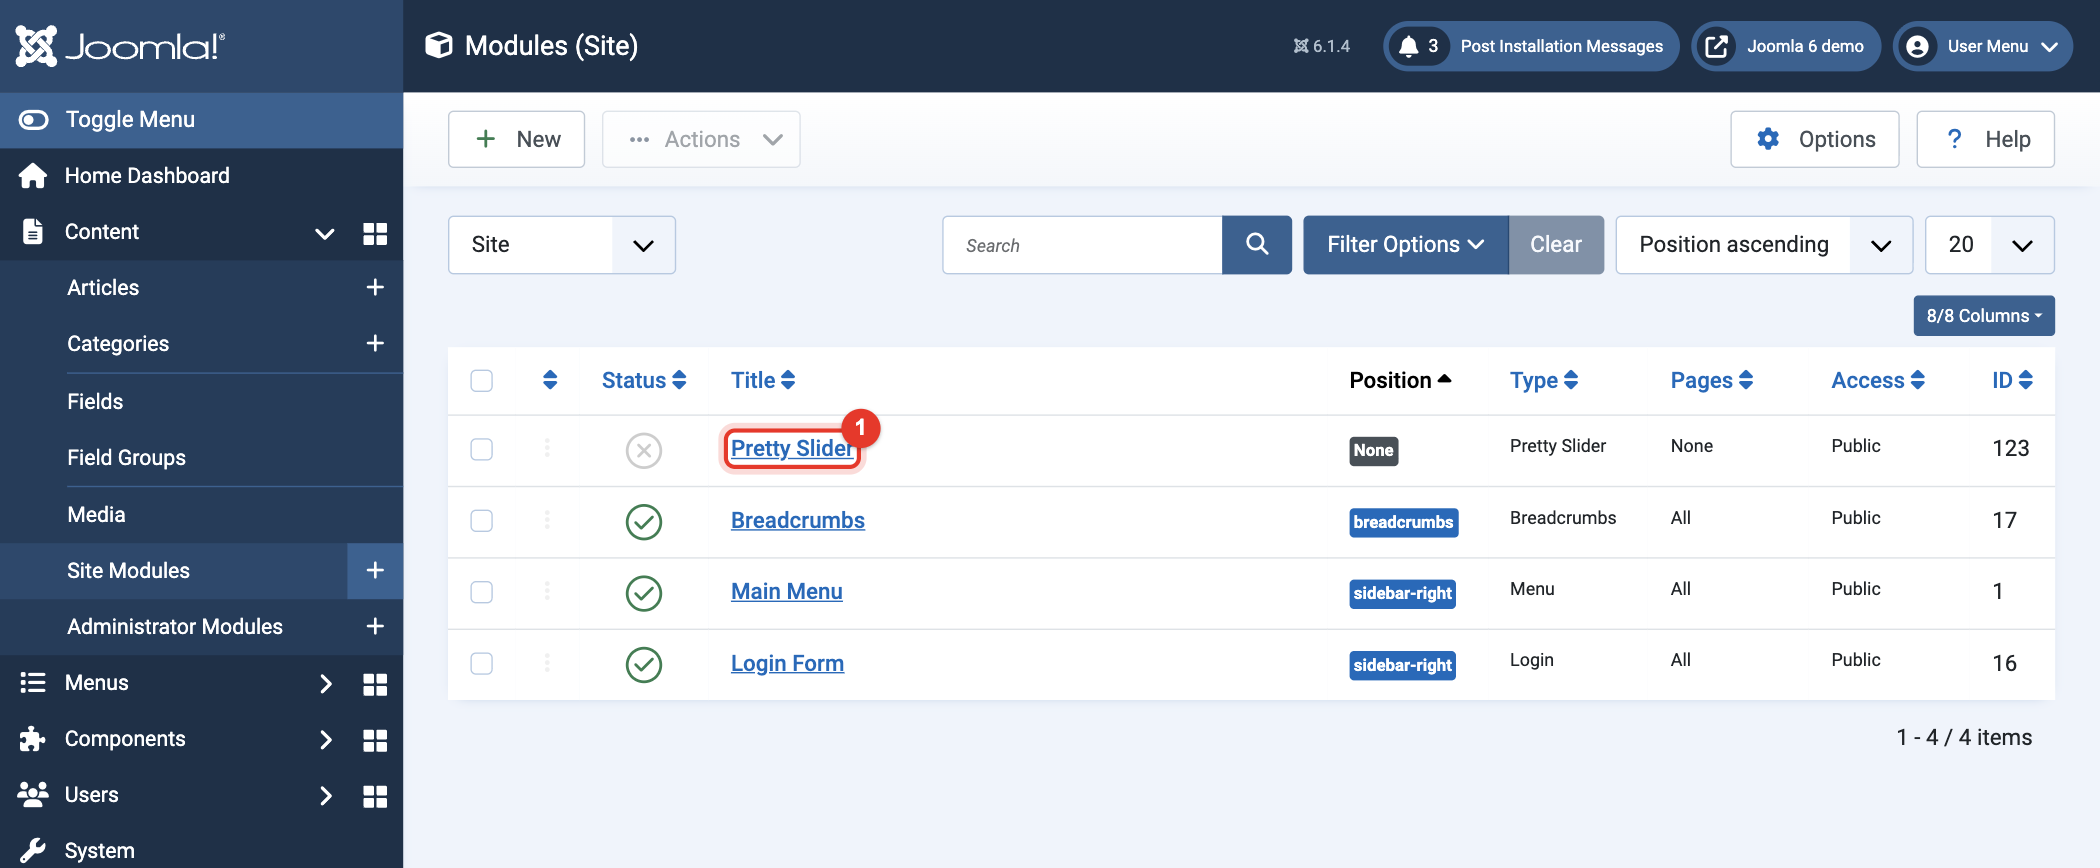
- The installation has added a module called Pretty Slider. It is not published yet and has no position. Click its title (1).
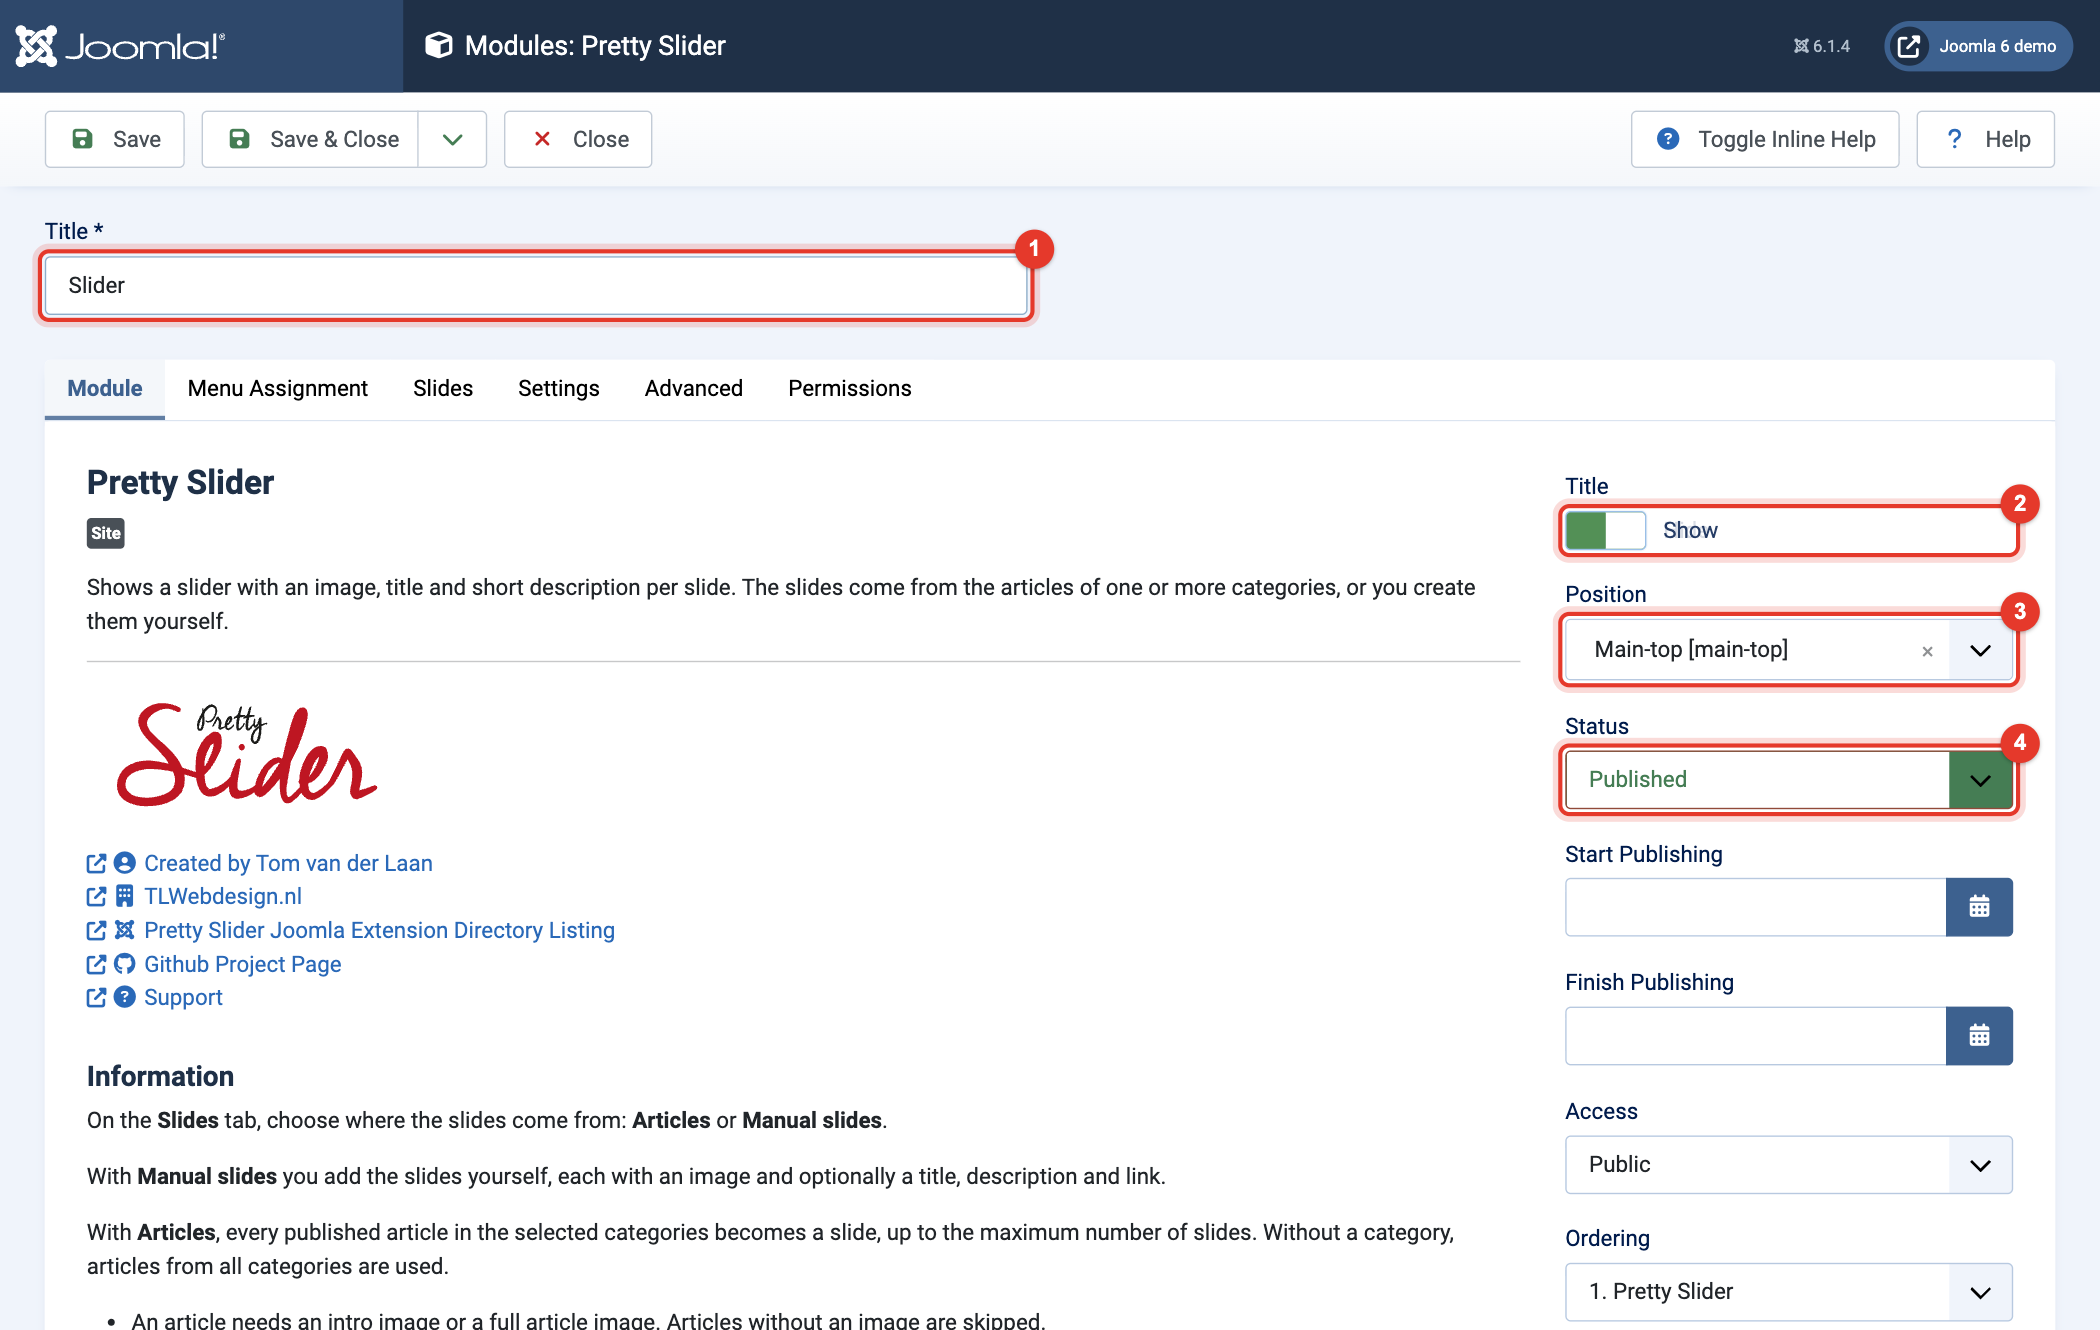
- On the tab Module:
- Change the Title (1), for example to Slider.
- With Title on the right (2) you choose whether the title is shown on the website: Show or Hide. For a slider, Hide usually looks best.
- Choose the Position (3) of your template where the slider should appear. In this example with the Cassiopeia template: Main-top [main-top].
- Set Status (4) to Published. A new module is always unpublished.
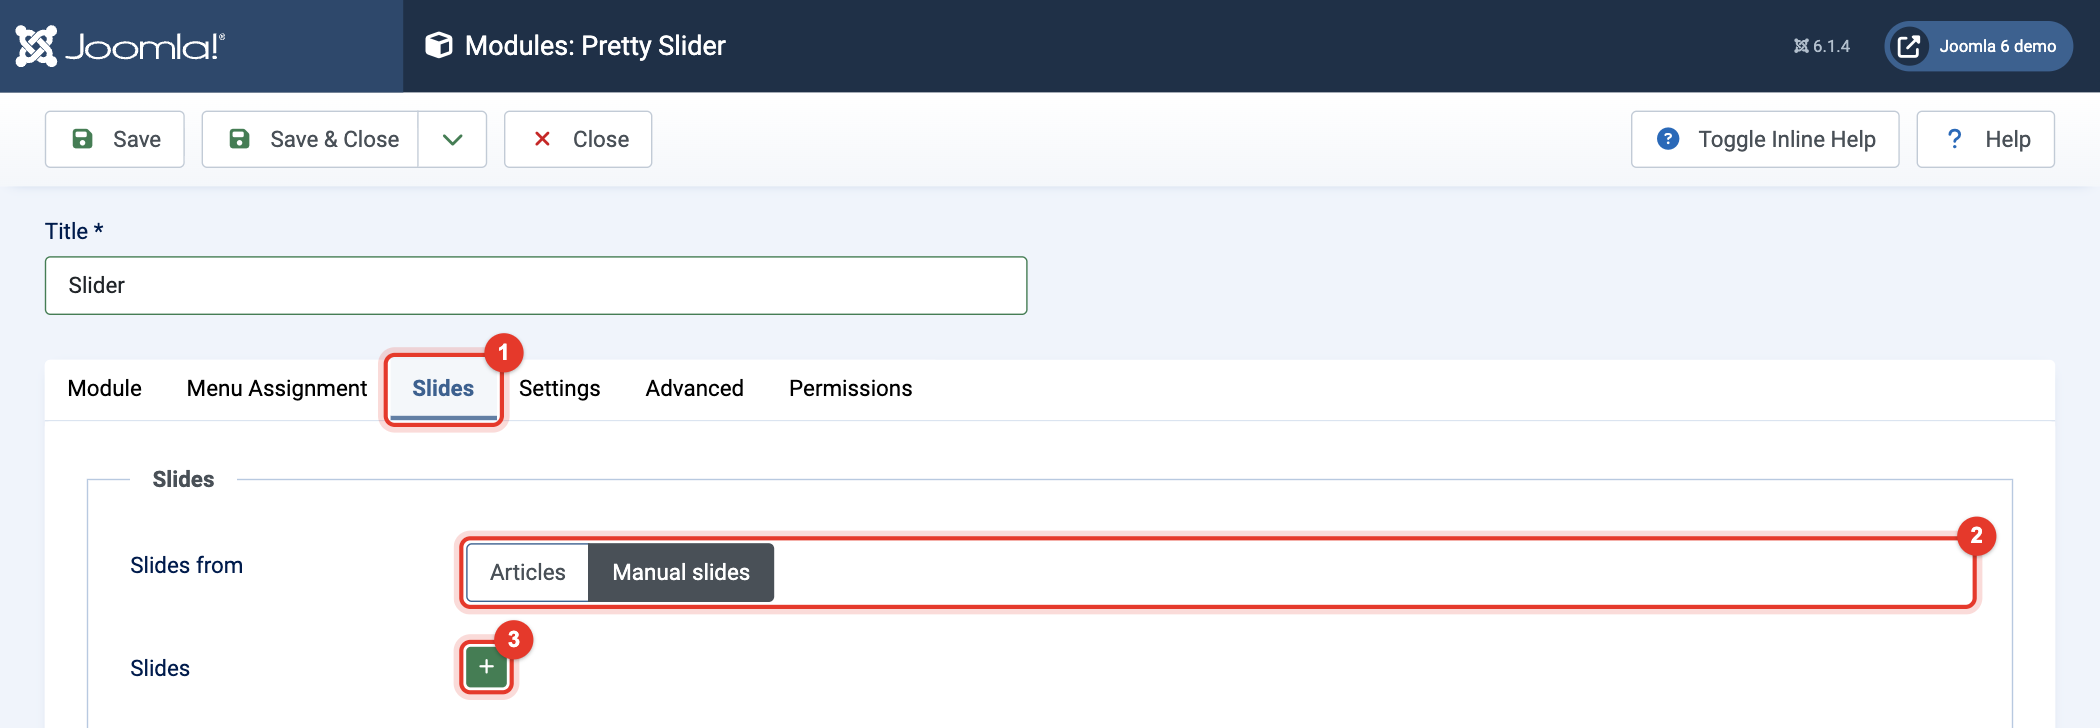
- Click the tab Slides (1) and choose at Slides from (2) where the slides come from:
- Articles: every published article in the selected categories becomes a slide. Step 7 shows the settings for this.
- Manual slides: you create the slides yourself in the module. This example uses this option.
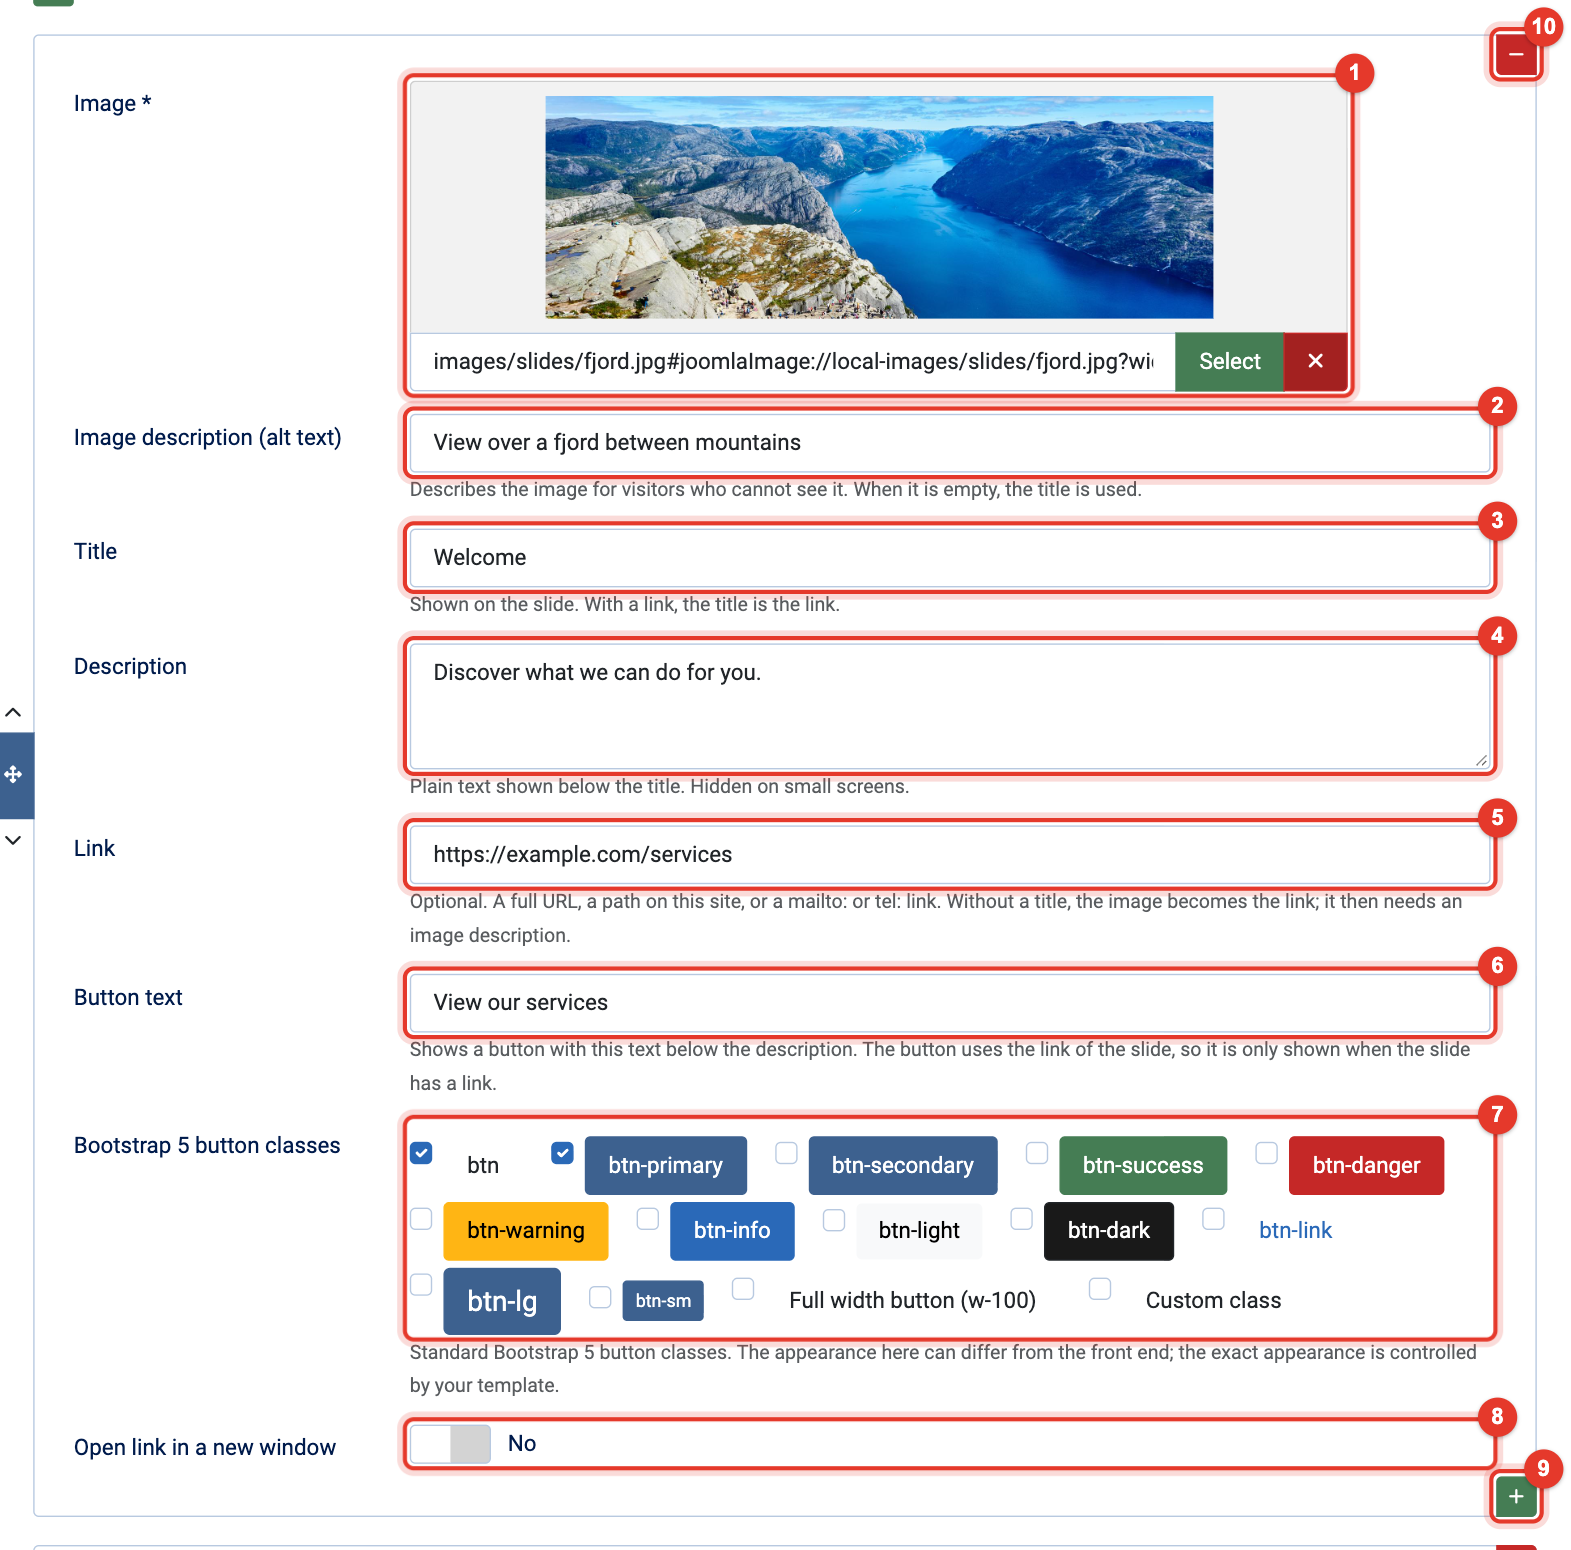
- Fill in the fields of the slide:
- Image (1): click Select and choose an image. This field is required.
- Image description (alt text) (2): describes the image for visitors who cannot see it. If you leave it empty, the title is used.
- Title (3): the text on the slide. If the slide has a link, the title is the link.
- Description (4): plain text below the title.
- Link (5): optional. This can be a web address (https://...), a path on your own site (/contact), or a mailto: or tel: link. If the slide has no title, the image becomes the link.
- Button text (6): shows a button with this text below the description. The button uses the link of the slide, so it only appears when you entered a link.
- Bootstrap 5 button classes (7): tick btn and a colour such as btn-primary. With btn-lg or btn-sm you make the button larger or smaller. With Custom class an extra field appears for your own CSS class. The colours shown here are examples; your template decides how the button looks on the website.
- Open link in a new window (8): choose Yes to open the link in a new window.
- With the green plus button (9) you add another slide below this one, and with the red minus button (10) you remove this slide. With the arrows on the left you change the order. The slides are shown in the order of this list.
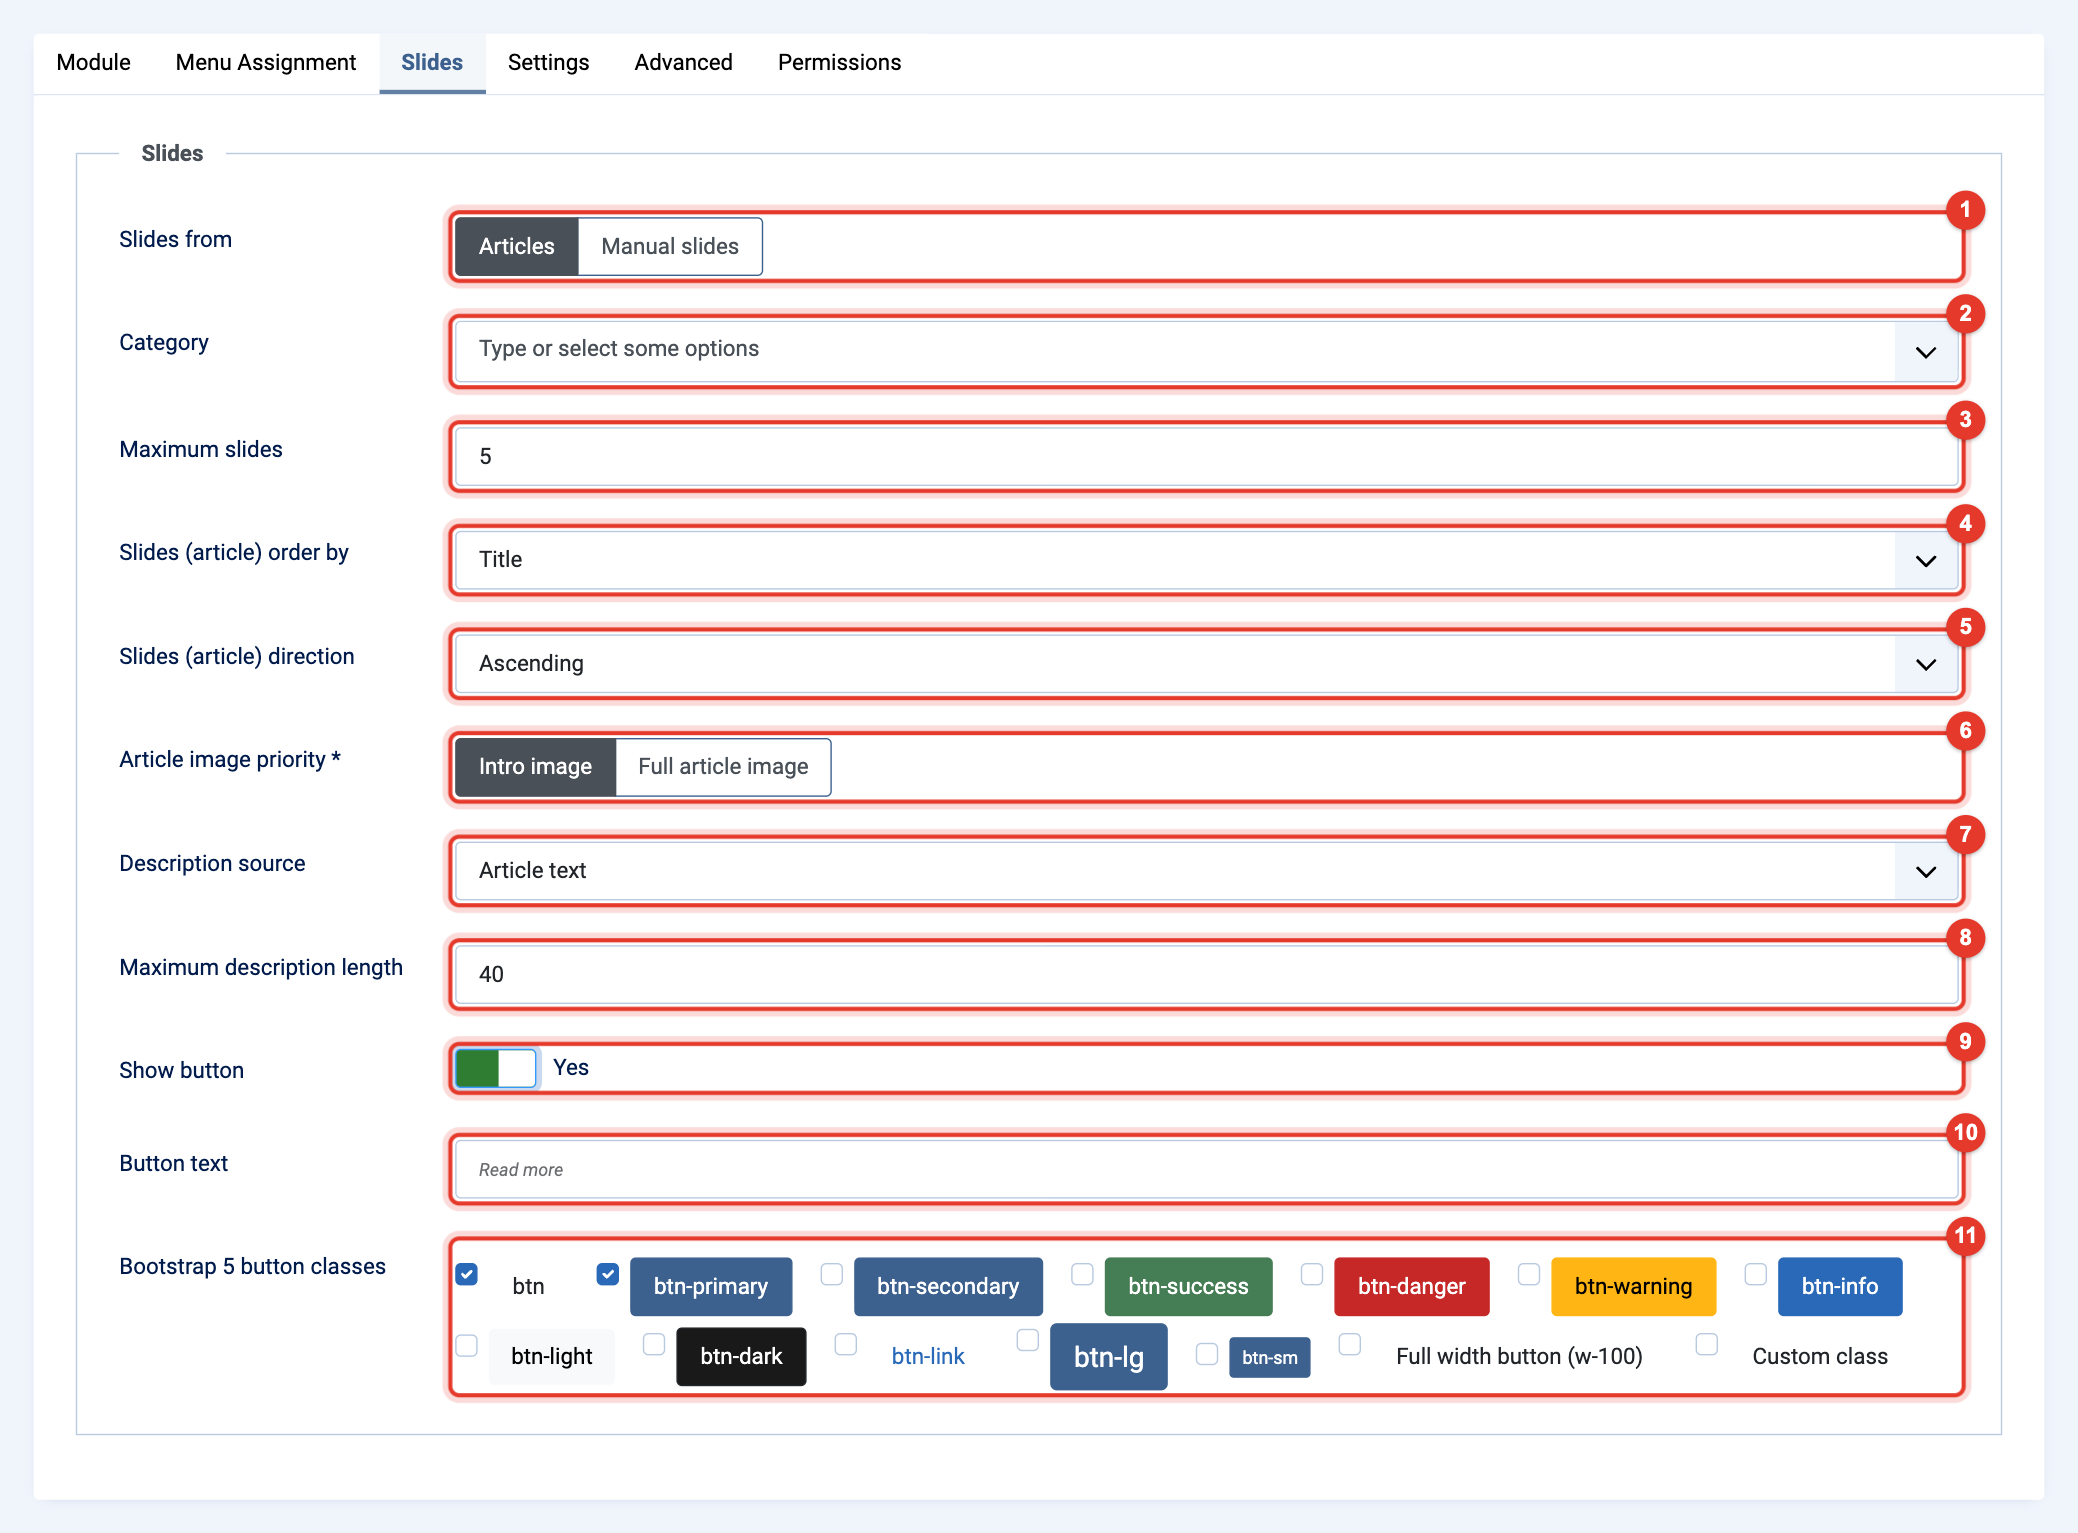
- If you choose Articles at Slides from (1), you see these settings instead of the slides:
- Category (2): the categories the articles come from. If you choose none, articles from all categories are used.
- Maximum slides (3): the maximum number of slides shown.
- Slides (article) order by (4) and direction (5): the order of the slides, for example by title, by created date or random.
- Article image priority (6): which image is used when an article has two: the intro image or the full article image. If the chosen image is missing, the other one is used. Articles without an image are skipped.
- Description source (7): the text below the title: the start of the article text, the alt text of the image or the caption of the image.
- Maximum description length (8): the maximum number of characters. Longer text is cut off after a word.
- Show button (9): choose Yes for a button on every slide that links to the article. Enter the text at Button text (10); if you leave it empty, it says "Read more". The button classes (11) work as in the previous step.
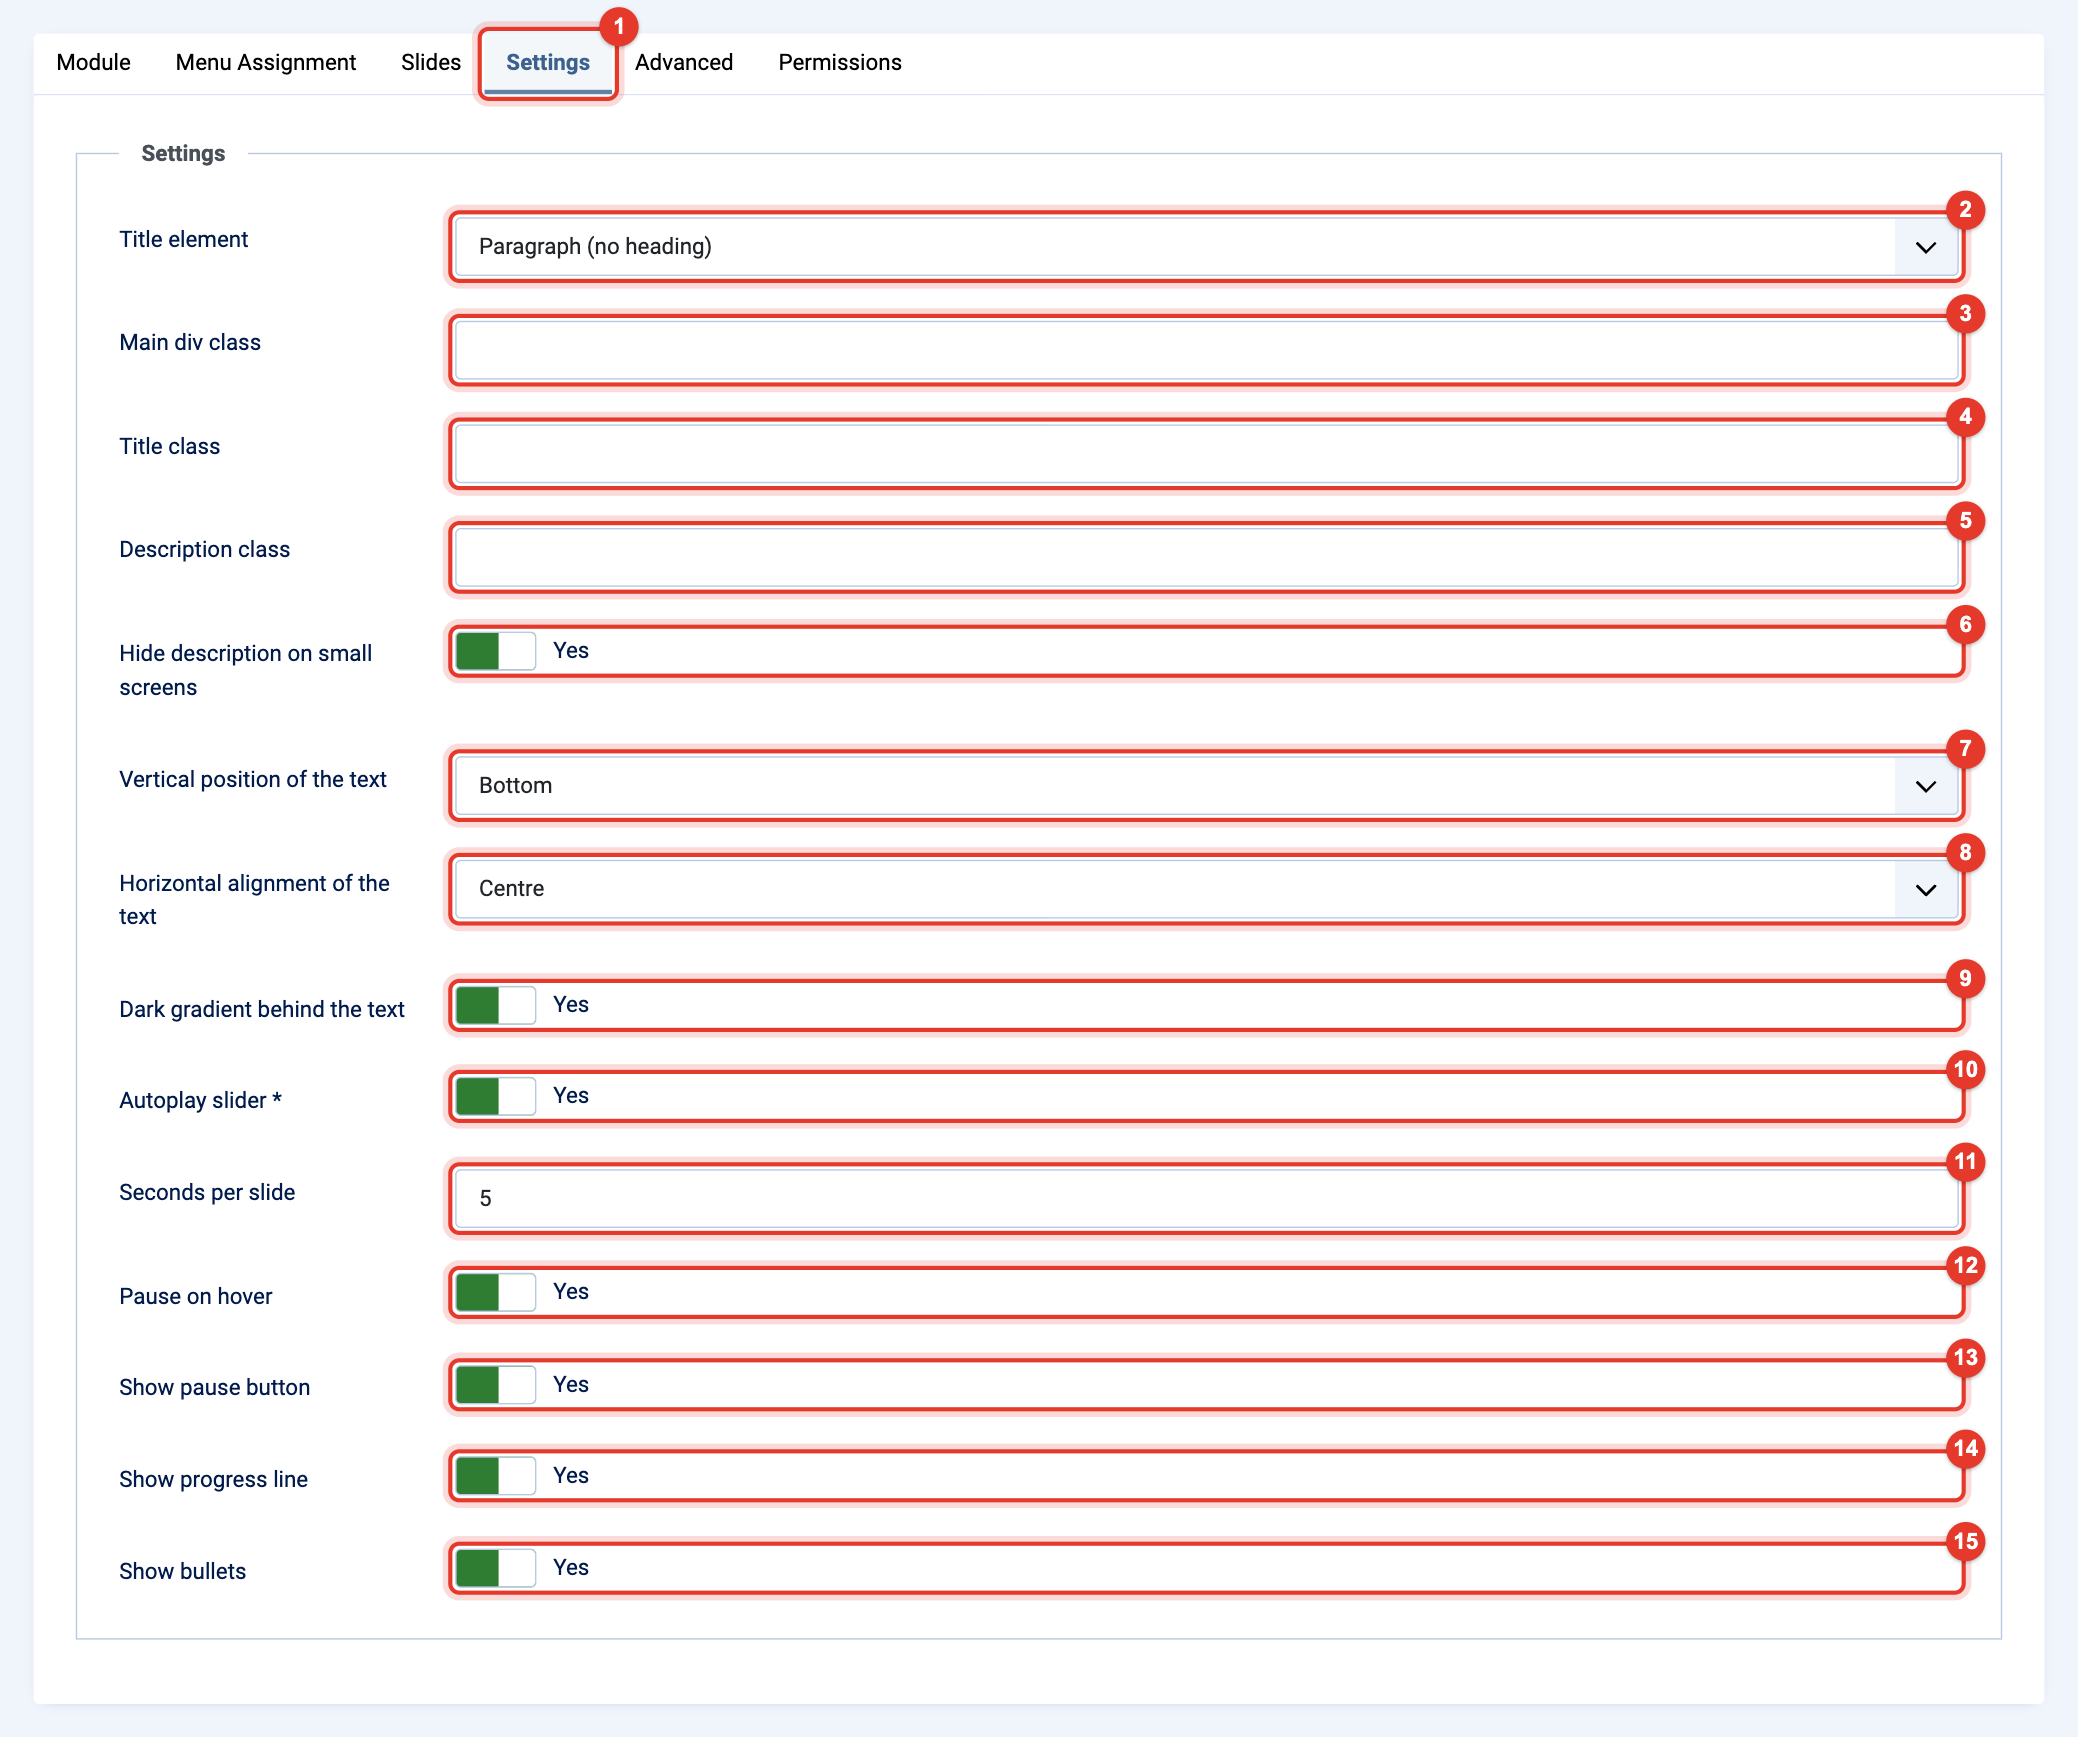
- Click the tab Settings (1). These settings apply to the whole slider:
- Title element (2): the HTML element of the slide title. Choose a heading level (h2 to h6) that fits the headings on the page, or Paragraph if the titles should not be headings.
- Main div class (3), Title class (4) and Description class (5): your own CSS classes for the block around the slider, the title and the description, for example h3 or display-6 for a larger title.
- Hide description on small screens (6): with Yes the description is hidden on phones. The title, link and button stay visible.
- Vertical position of the text (7): the text at the top, in the middle or at the bottom of the image.
- Horizontal alignment of the text (8): the text on the left, in the centre or on the right.
- Dark gradient behind the text (9): keeps the white text readable on light images.
- Autoplay slider (10): with Yes the next slide appears by itself, after the number of Seconds per slide (11). For visitors who prefer reduced motion, autoplay does not start by itself.
- Pause on hover (12): the slides wait while the mouse pointer is on the slider.
- Show pause button (13): a button that lets visitors pause and play the slides. Leave it on when the slider plays automatically; the accessibility guidelines (WCAG) ask for a way to pause.
- Show progress line (14): a line at the top of the slider that fills up until the next slide appears.
- Show bullets (15): a bullet per slide at the bottom of the slider, which visitors use to go to a slide.
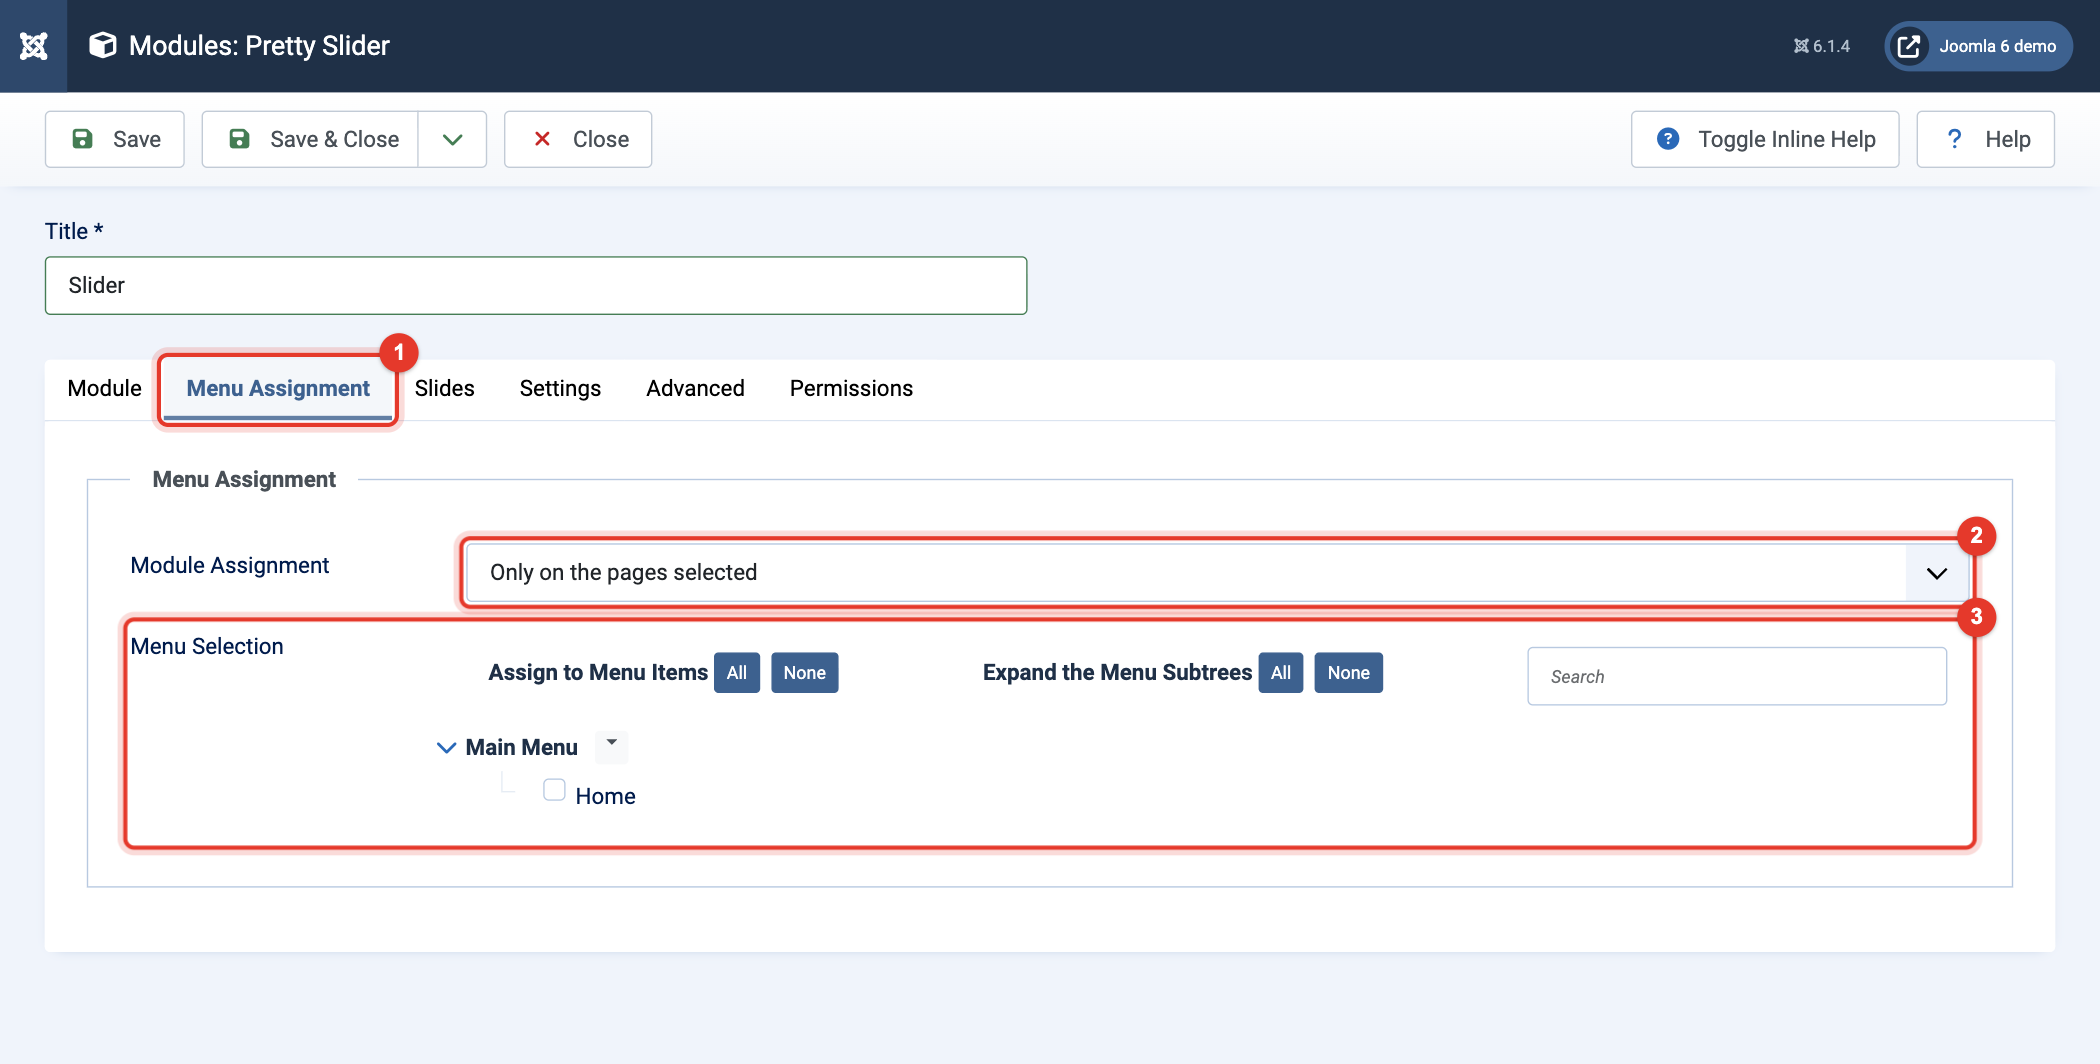
- Click the tab Menu Assignment (1) and choose at Module Assignment (2) on which pages the module is shown:
- On all pages: on every page of the website.
- No pages: on no page at all.
- Only on the pages selected: only on the menu items you tick in the list (3).
- On all pages except those selected: on every page, except the menu items you tick.
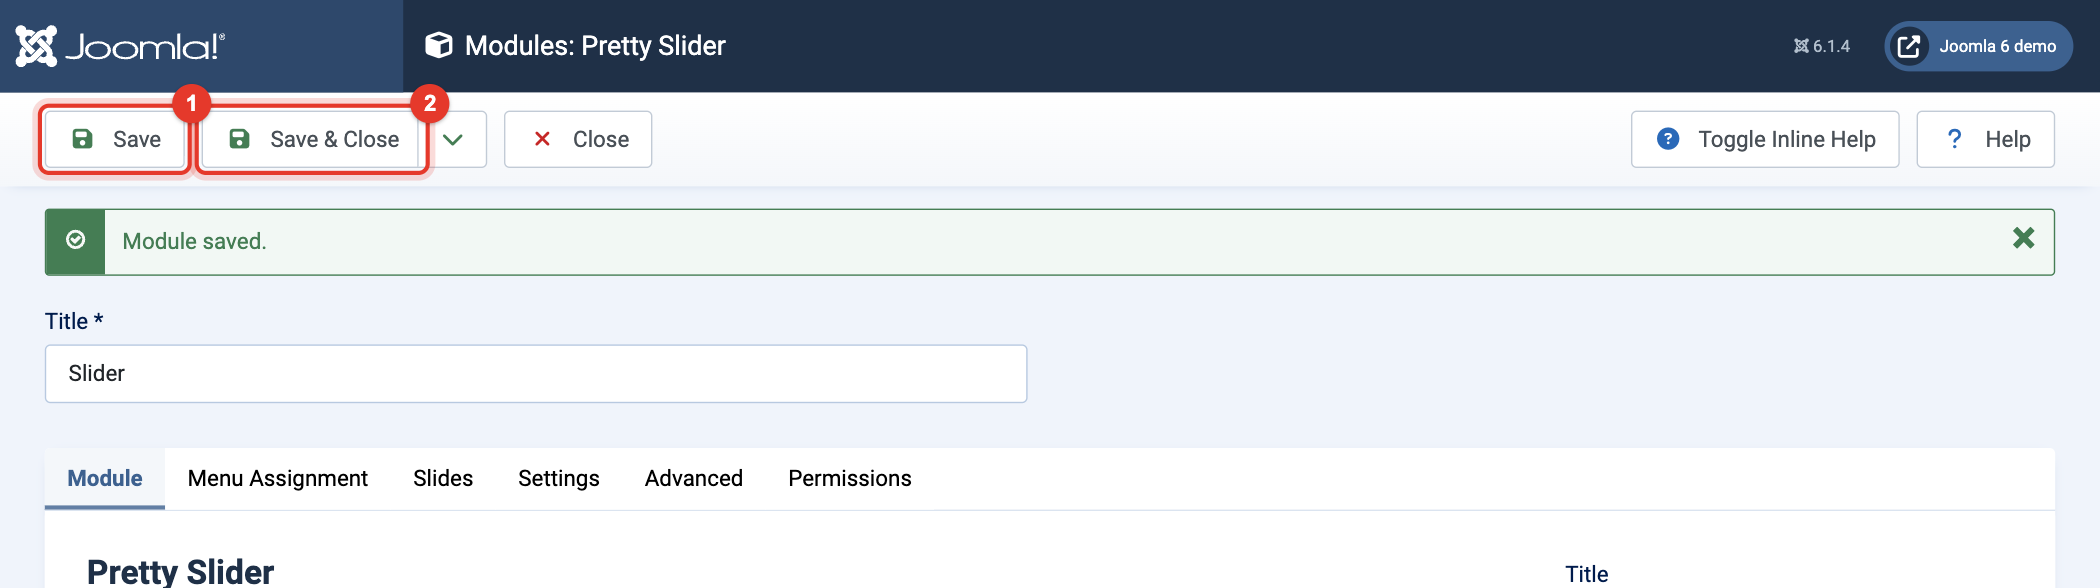
- Click Save (1) to save and keep the module open, so you can check the result on your website and adjust it. Click Save & Close (2) when you are done.
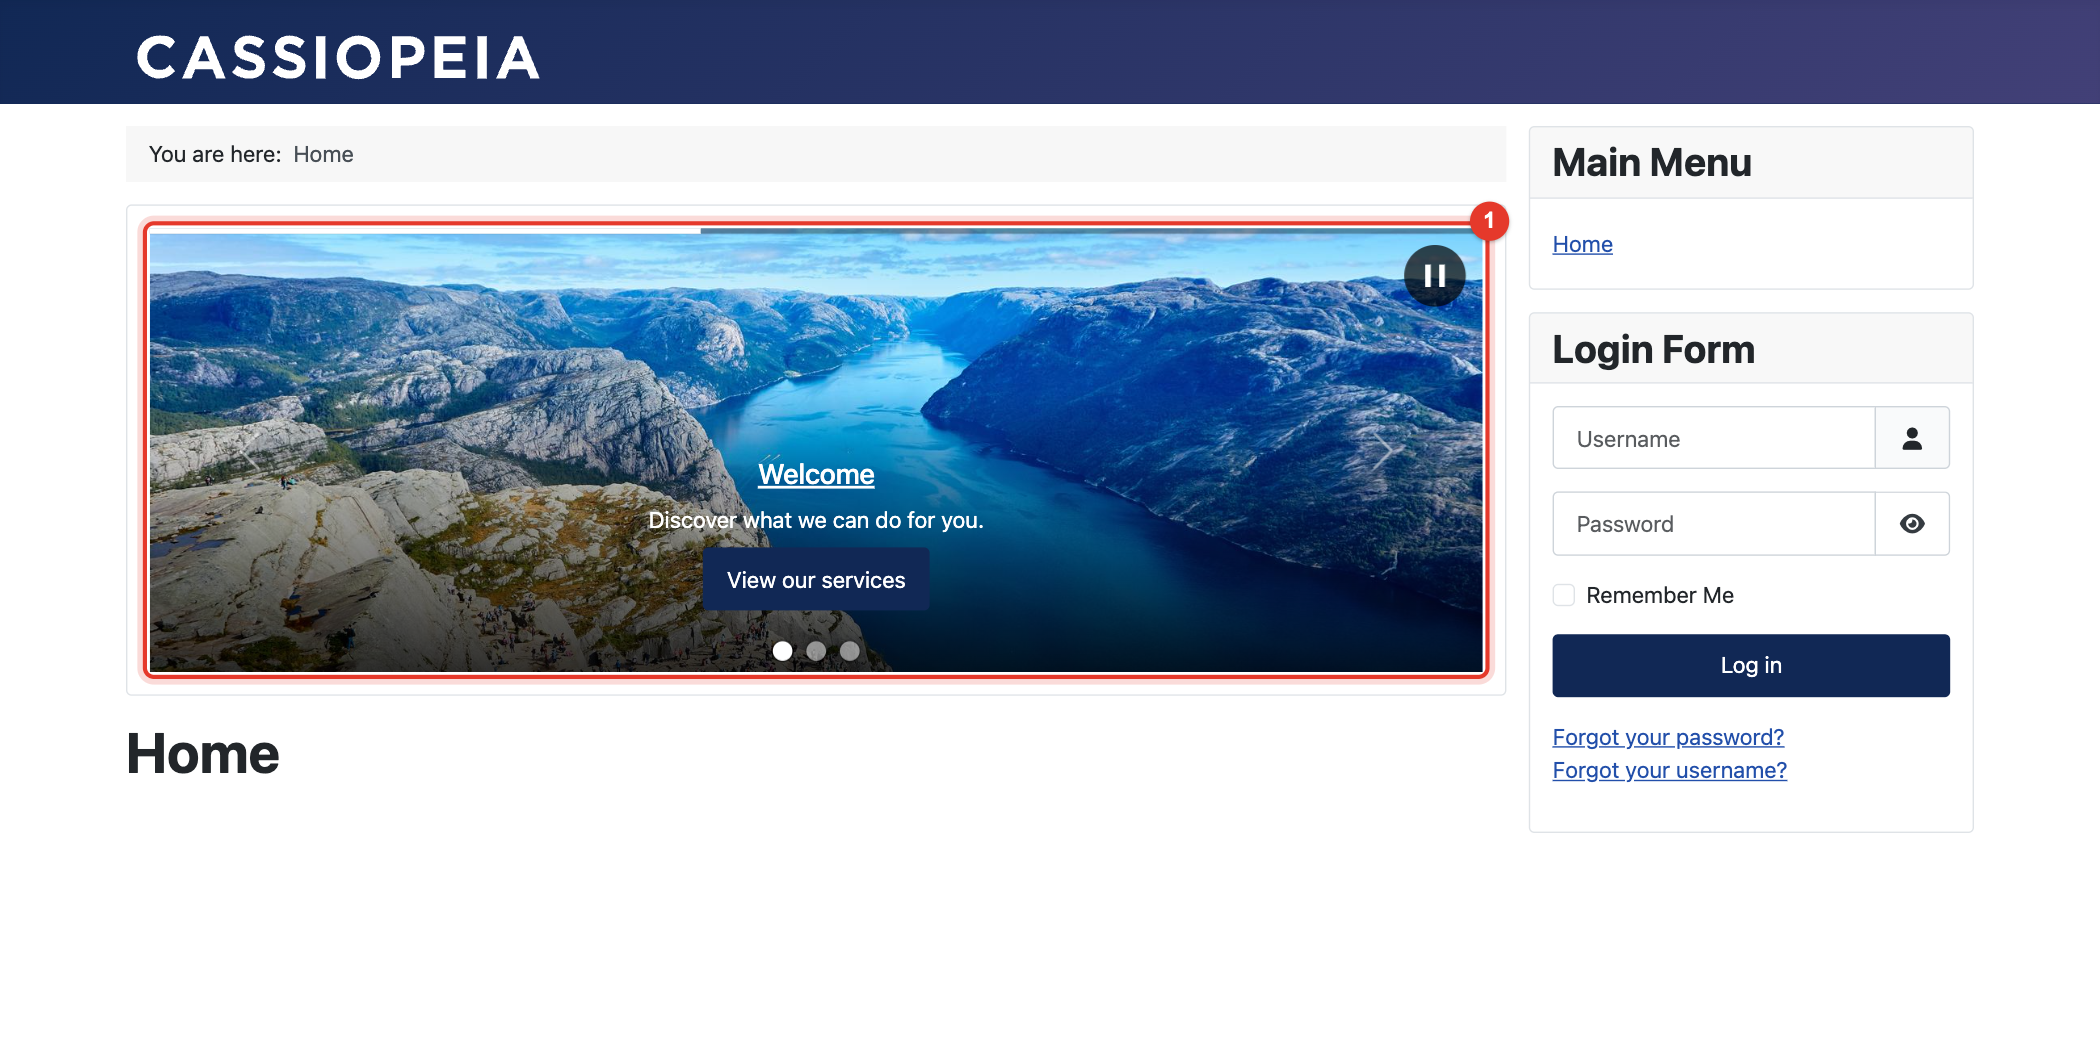
- The result on the website (1):
You can find examples here: https://extensions.tlwebdesign.nl/en/pretty-slider
Assign or adjust module position / page view Pretty Slider
These steps move Pretty Slider to another module position or change the pages it is shown on.
- Log in to the back-end (administrator) of Joomla with a Super User account. You usually find it at https://<yourdomain>/administrator/. Then click System in the menu on the left, as in steps 2 and 3 of the first manual.
- In the block Manage, click Site Modules and then click the title of your Pretty Slider module. The column Type shows which modules are of the type Pretty Slider.
- On the tab Module, choose the new Position (3) on the right.
- Click the tab Menu Assignment (1) and choose at Module Assignment (2) on which pages the module is shown. With "Only on the pages selected" and "On all pages except those selected" you tick the menu items in the list (3).
- Click Save & Close and check on your website that the module is shown on the right pages.
Update Pretty Slider
When a new version is available, Joomla shows it in the back-end, just like updates of other extensions. Important: always make a backup of your website before updating!
- Log in to the back-end (administrator) of Joomla with a Super User account.
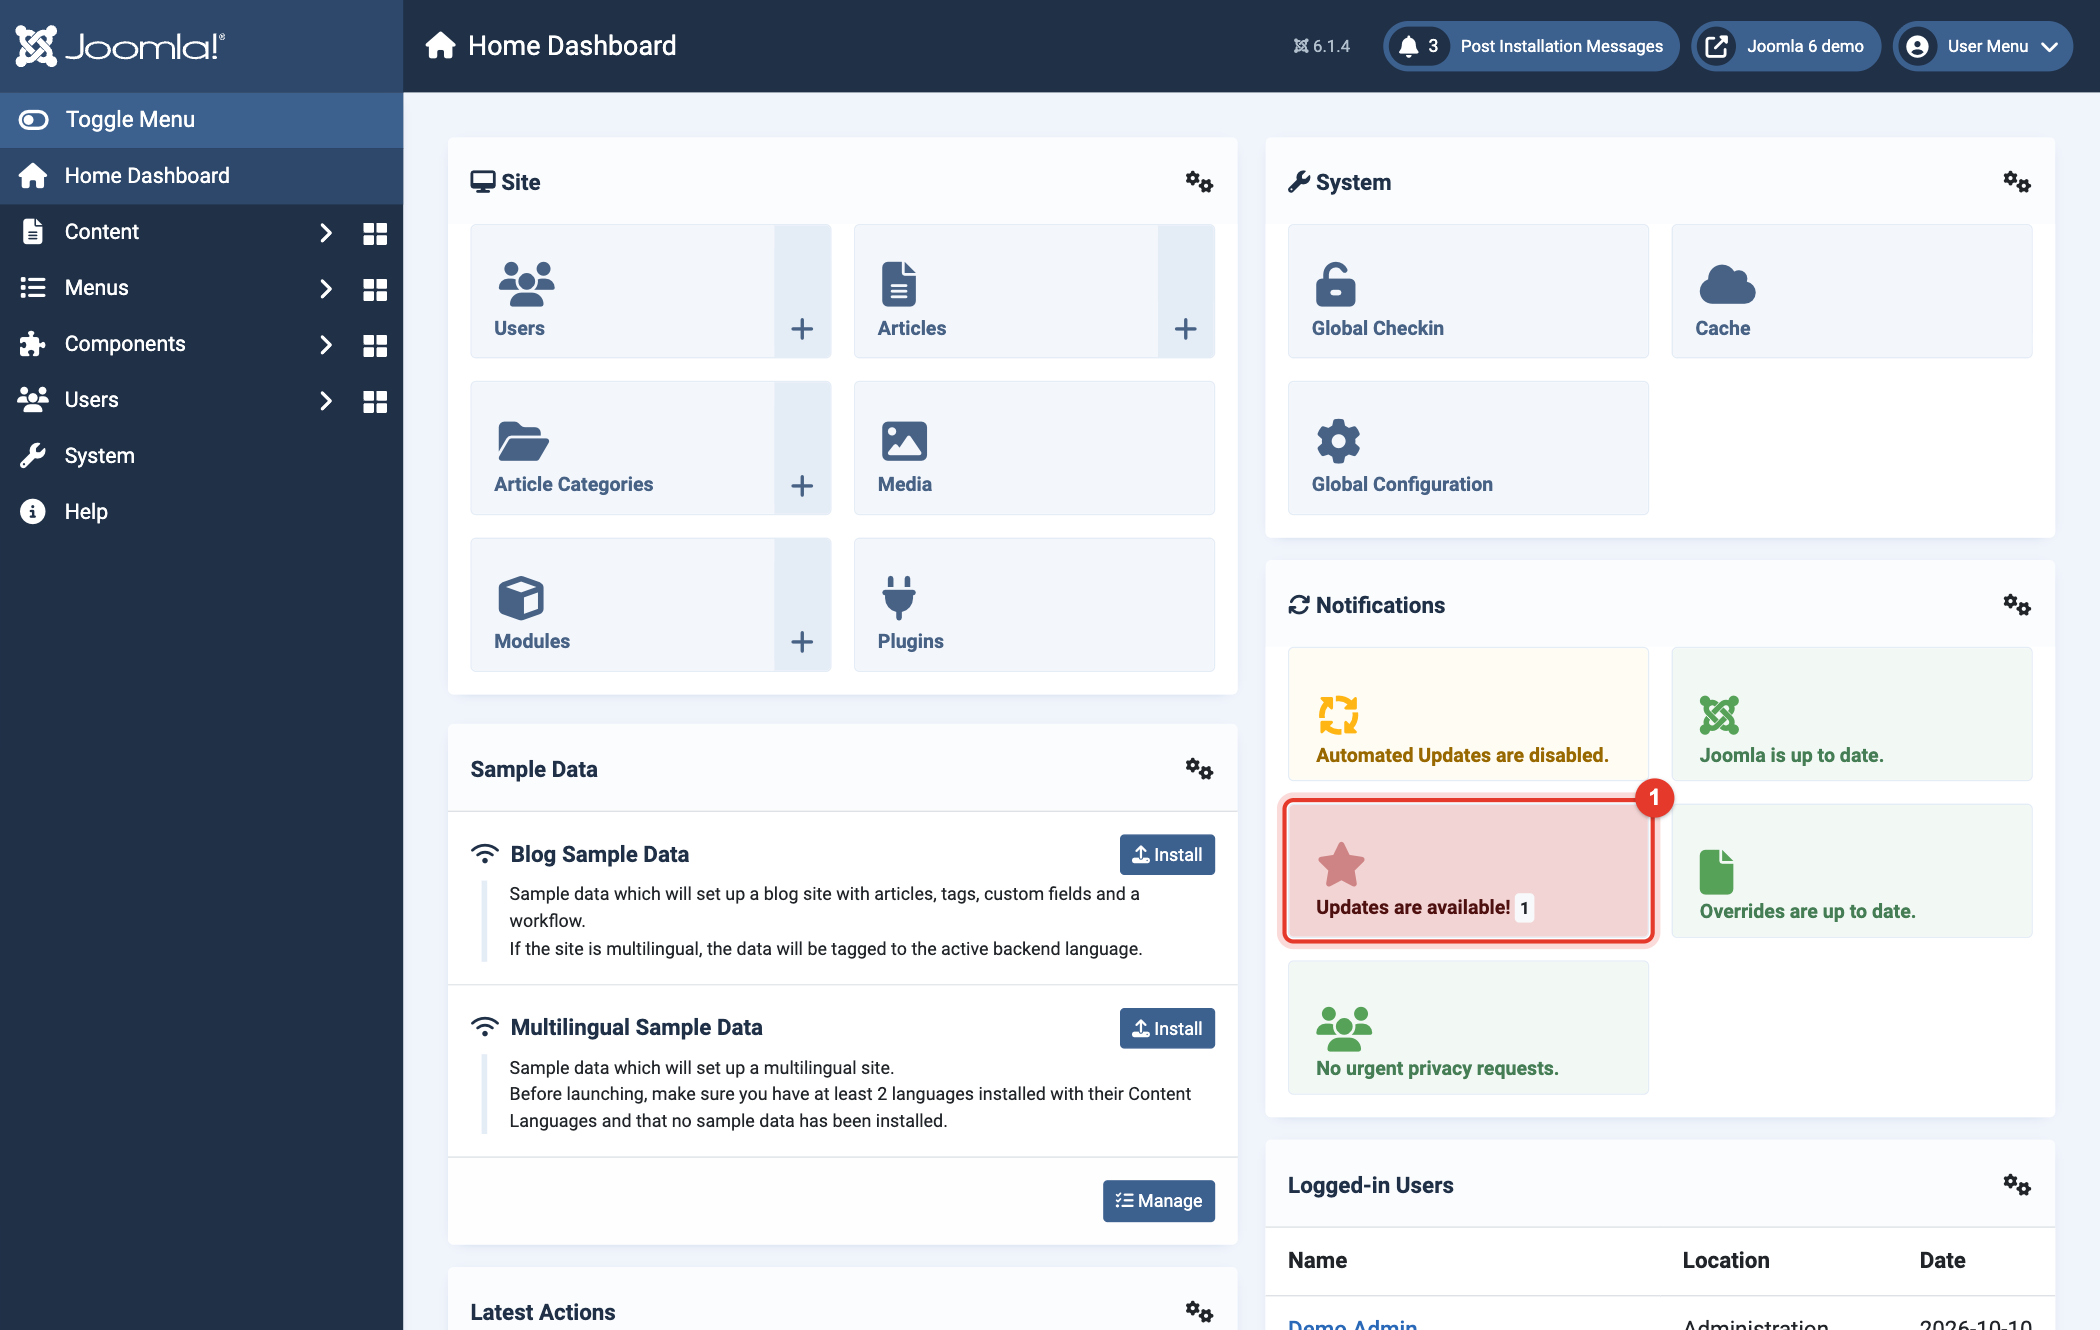
- On the Home Dashboard, in the block Notifications, click Updates are available! (1). You can also click System and then, in the block Update, Extensions.
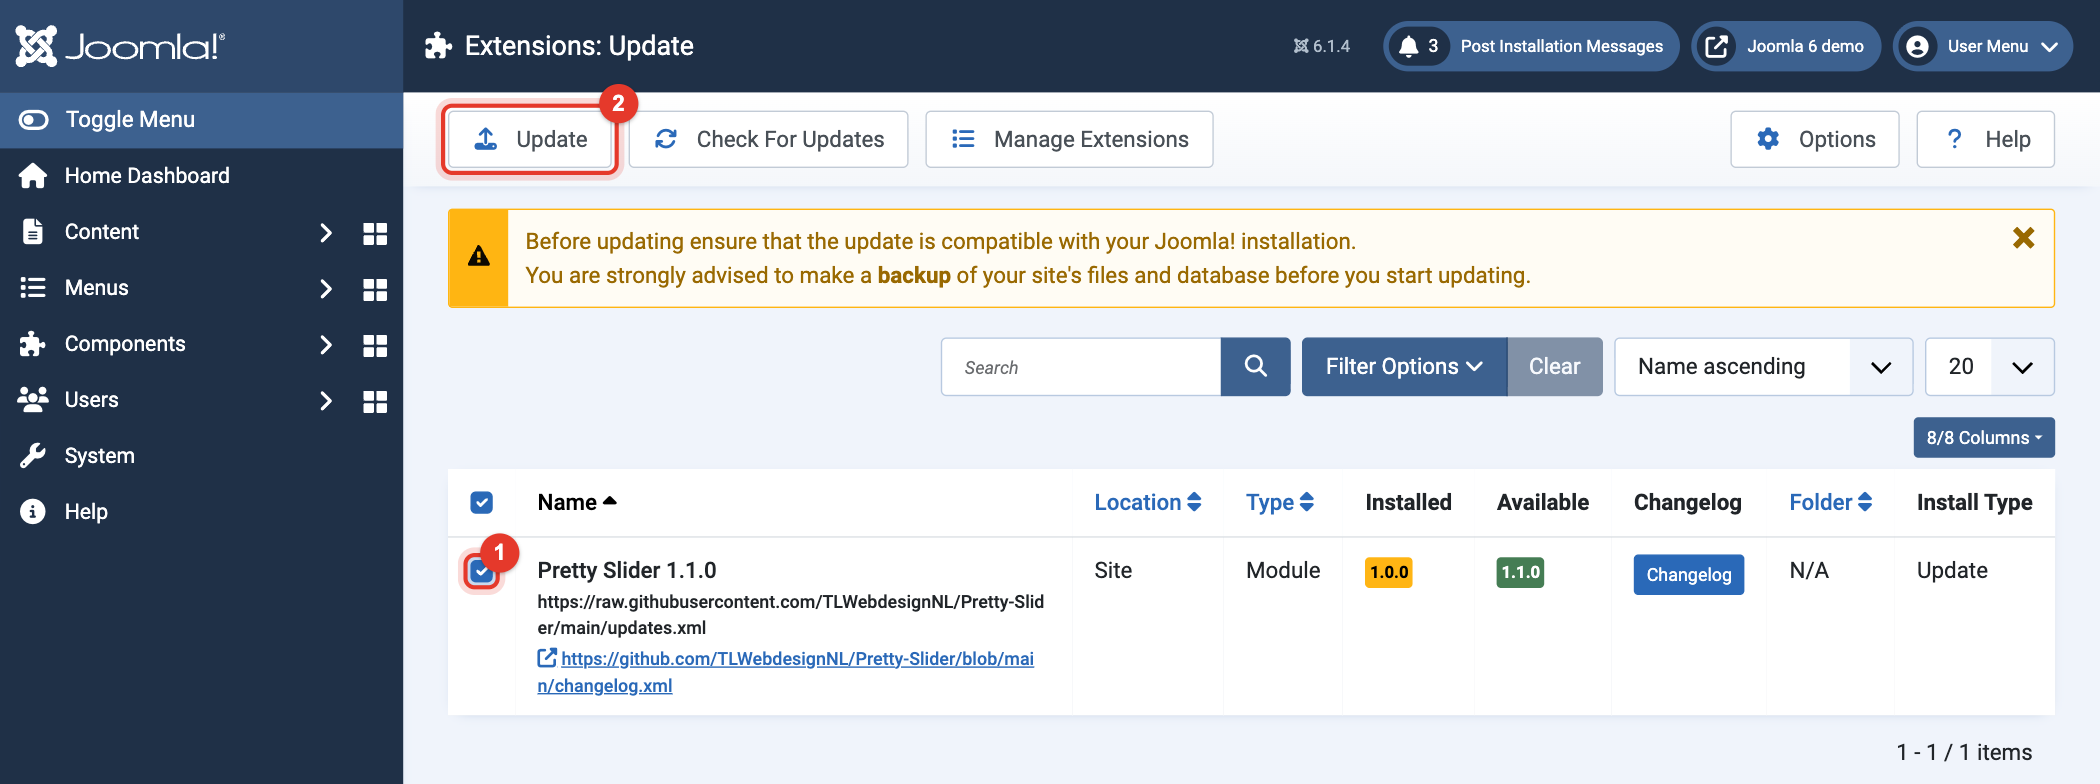
- Tick the box in front of Pretty Slider (1) and click Update (2). In this example the module goes from version 1.0.0 to 1.1.0.
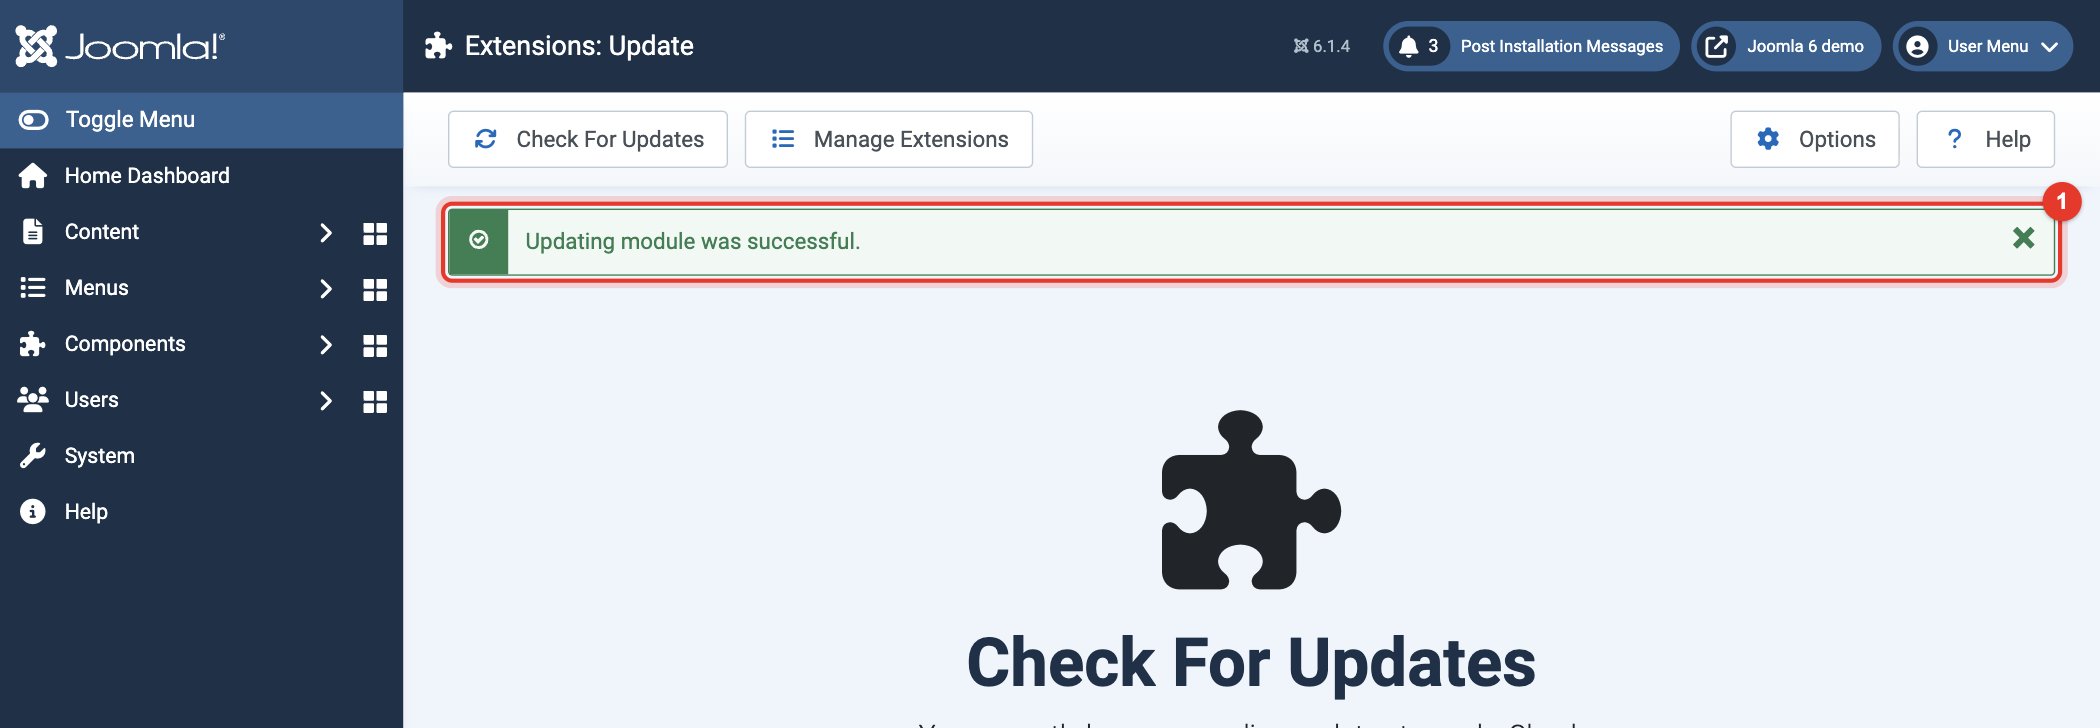
- The message "Updating module was successful." appears (1).
- Check on your website that Pretty Slider still works properly.
Uninstall Pretty Slider
If you no longer want to use Pretty Slider, you can uninstall it. All Pretty Slider modules you made are removed as well.
- Log in to the back-end (administrator) of Joomla with a Super User account. You usually find it at https://<yourdomain>/administrator/. Then click System in the menu on the left, as in steps 2 and 3 of the first manual.
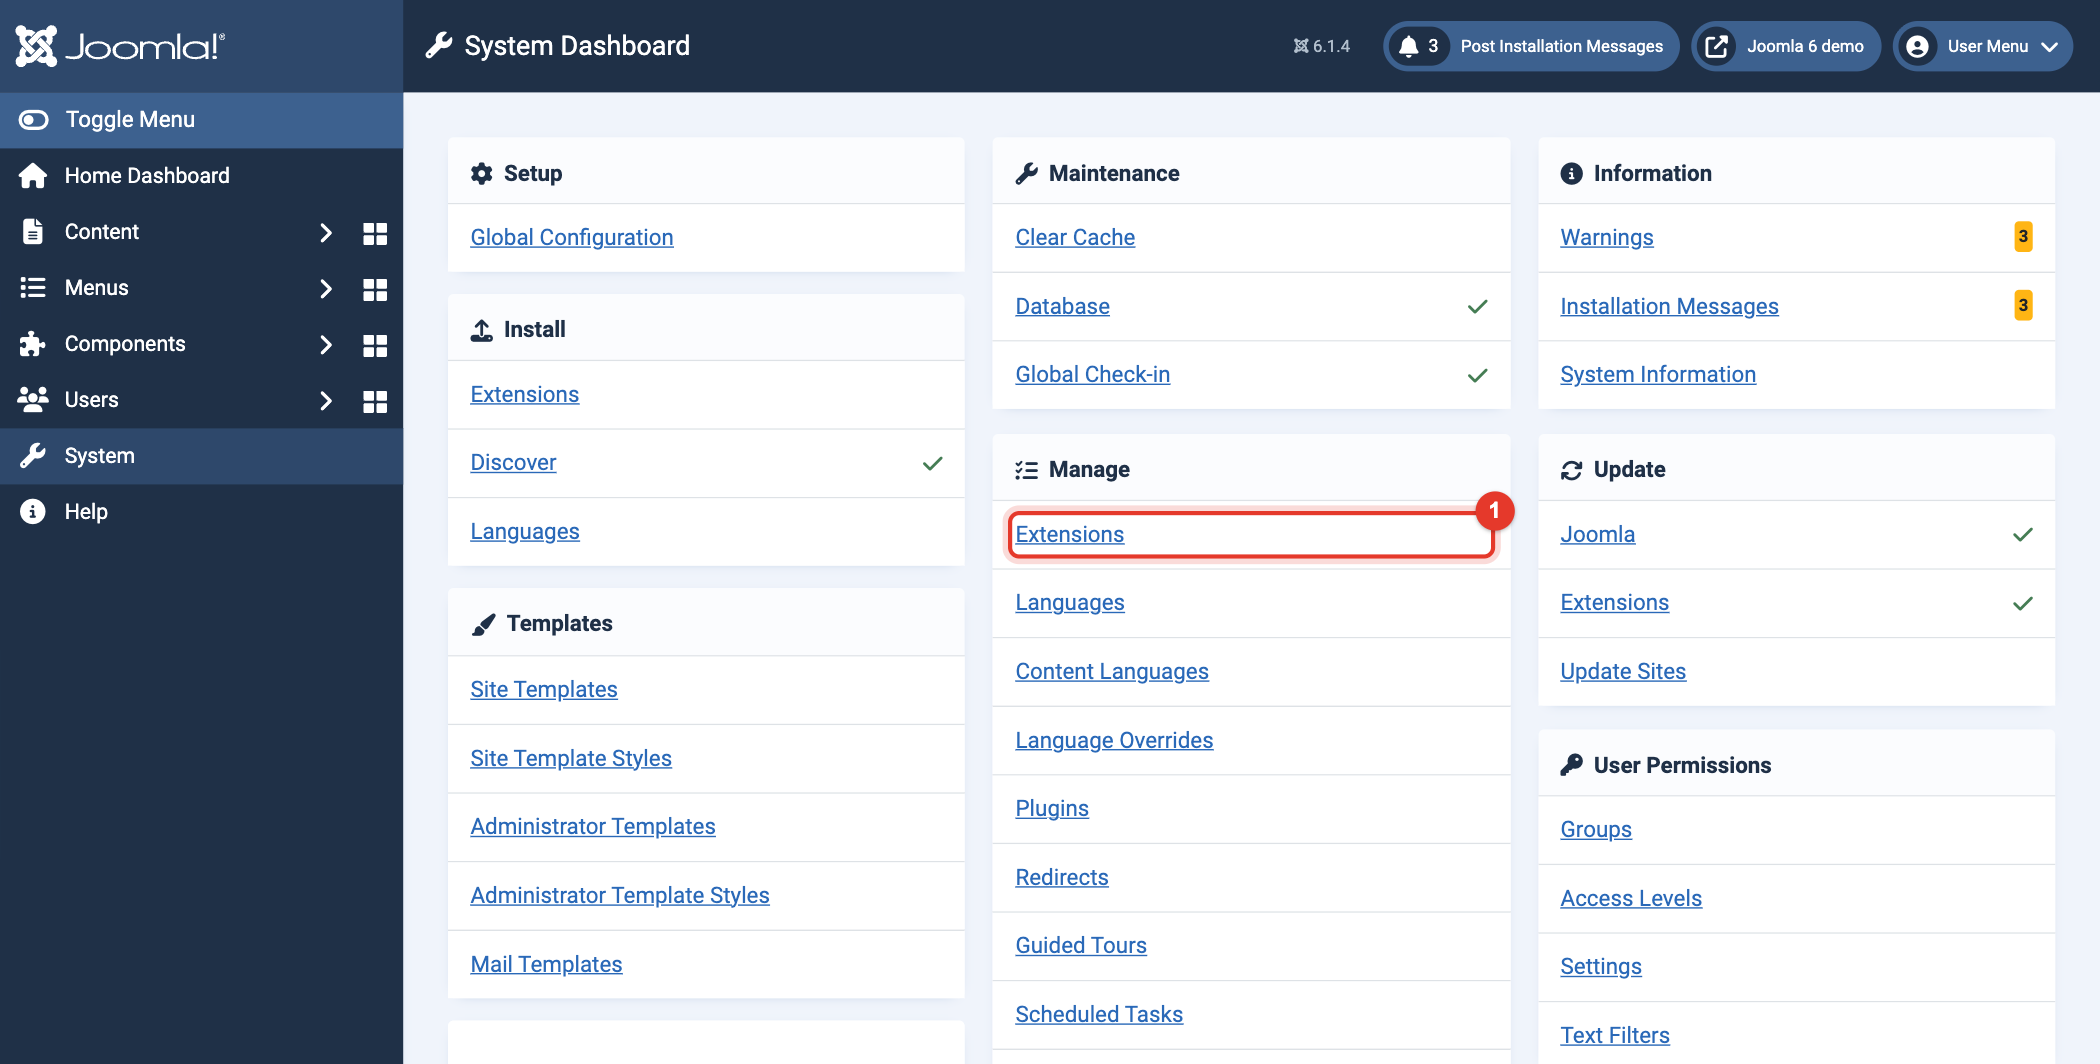
- In the block Manage, click Extensions (1).
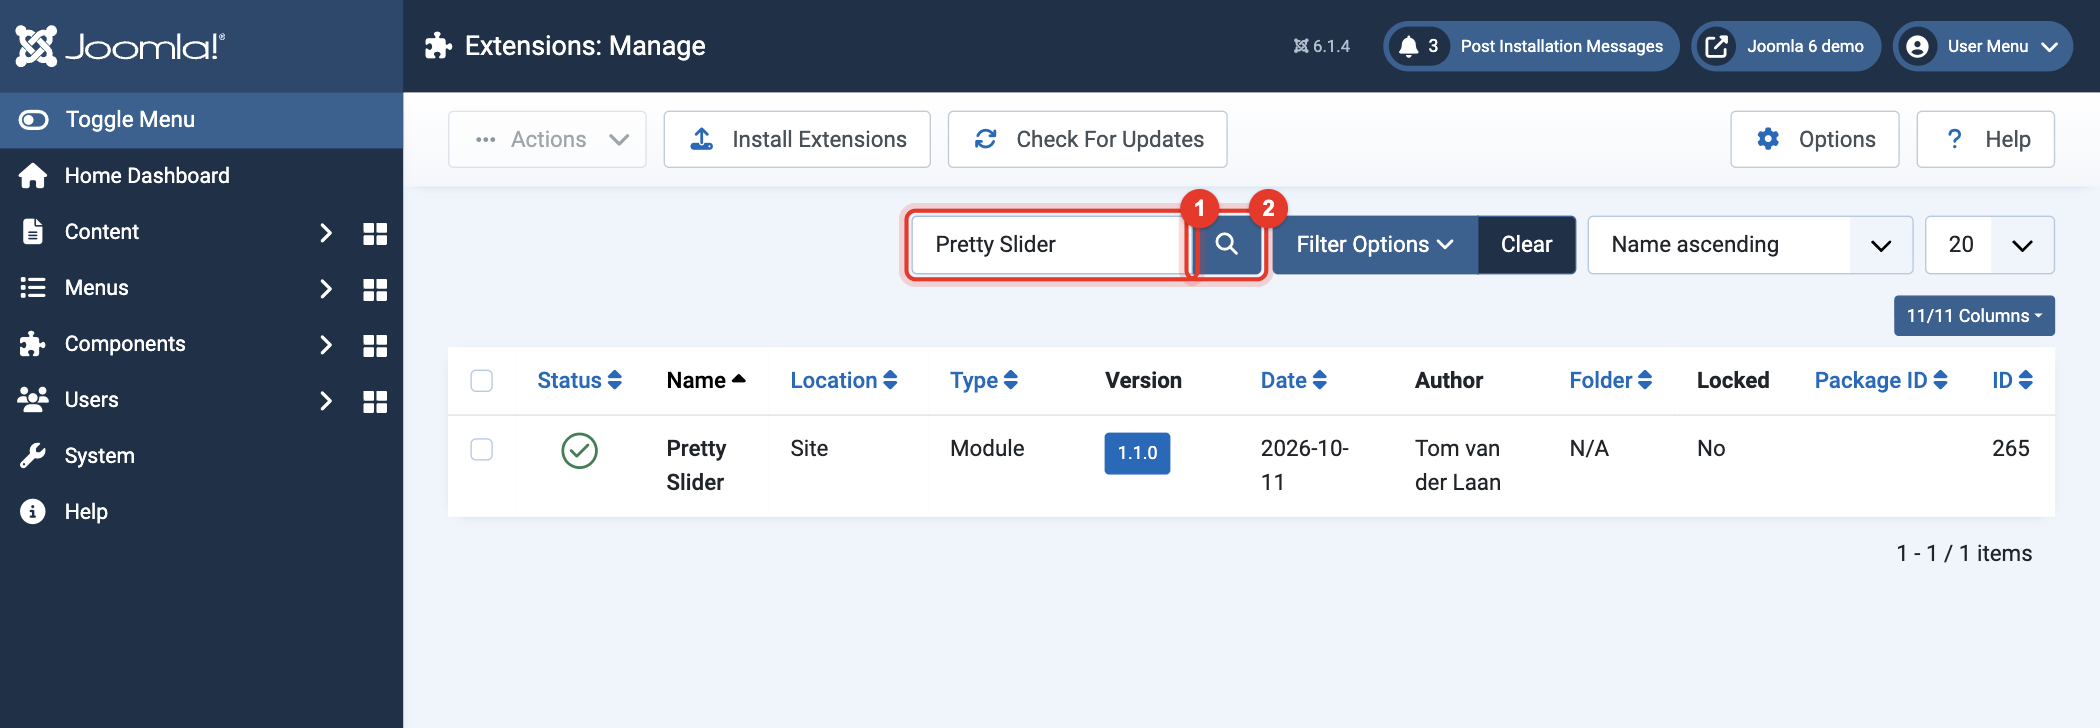
- Type Pretty Slider in the search field (1) and click the magnifying glass (2).
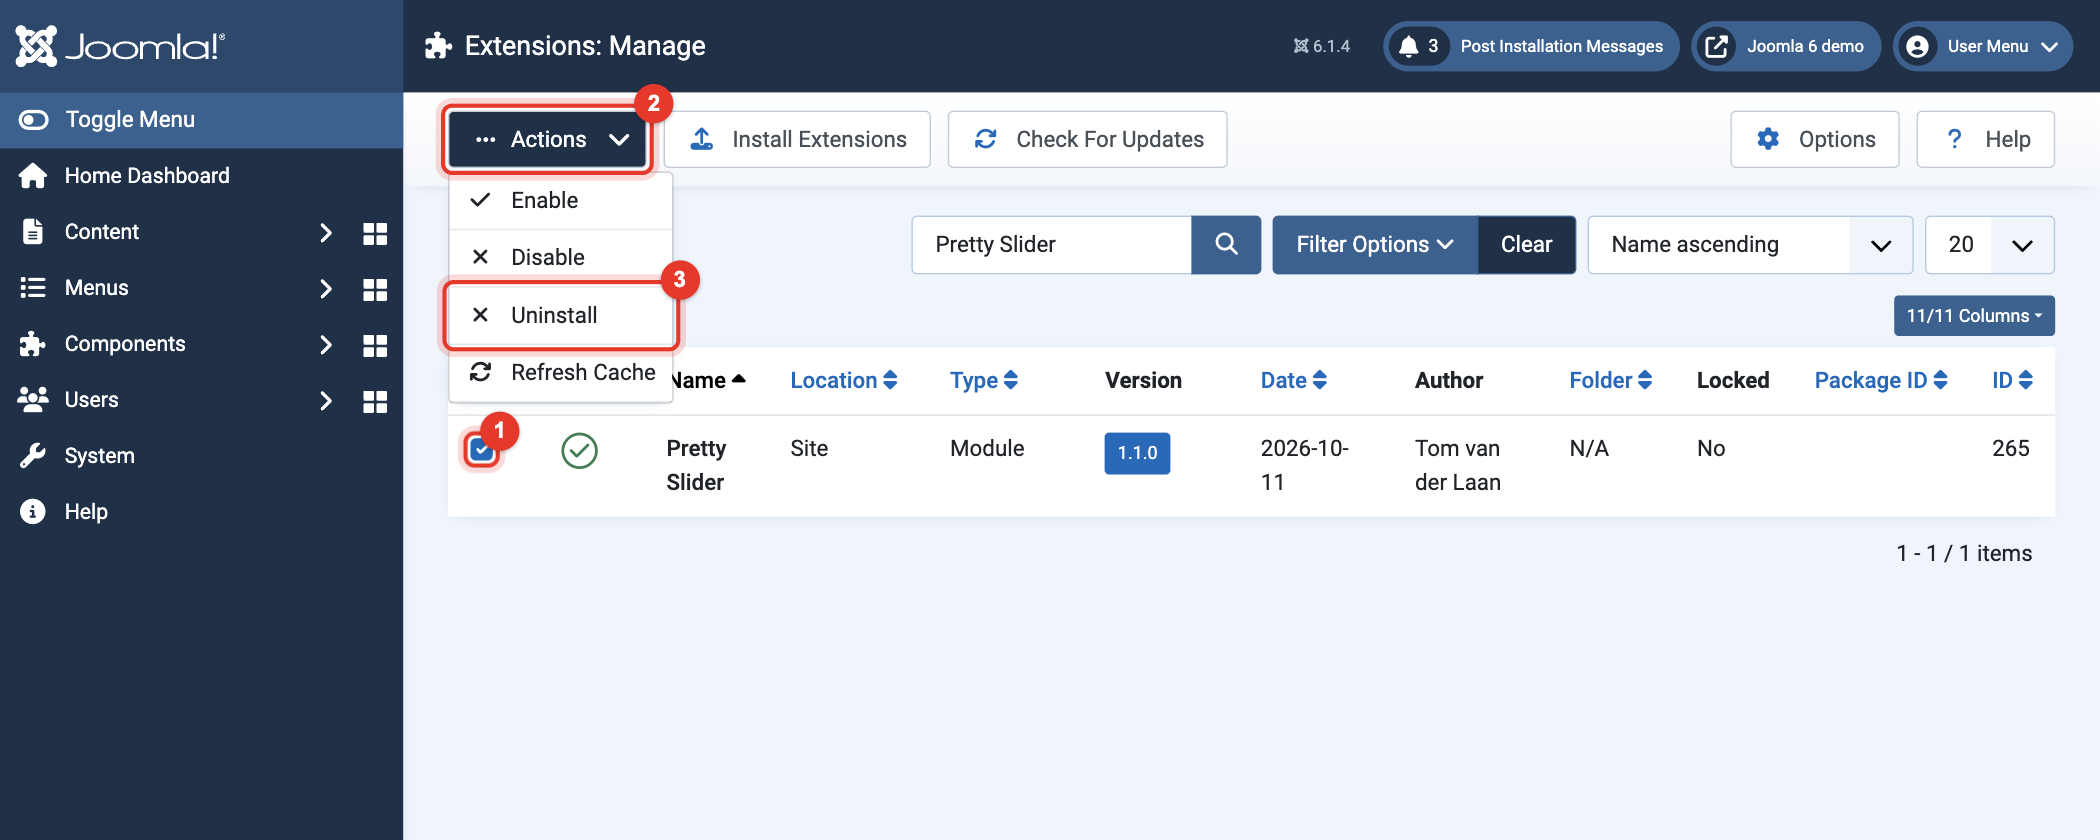
- Tick the box in front of Pretty Slider (1), click Actions (2) and then Uninstall (3).
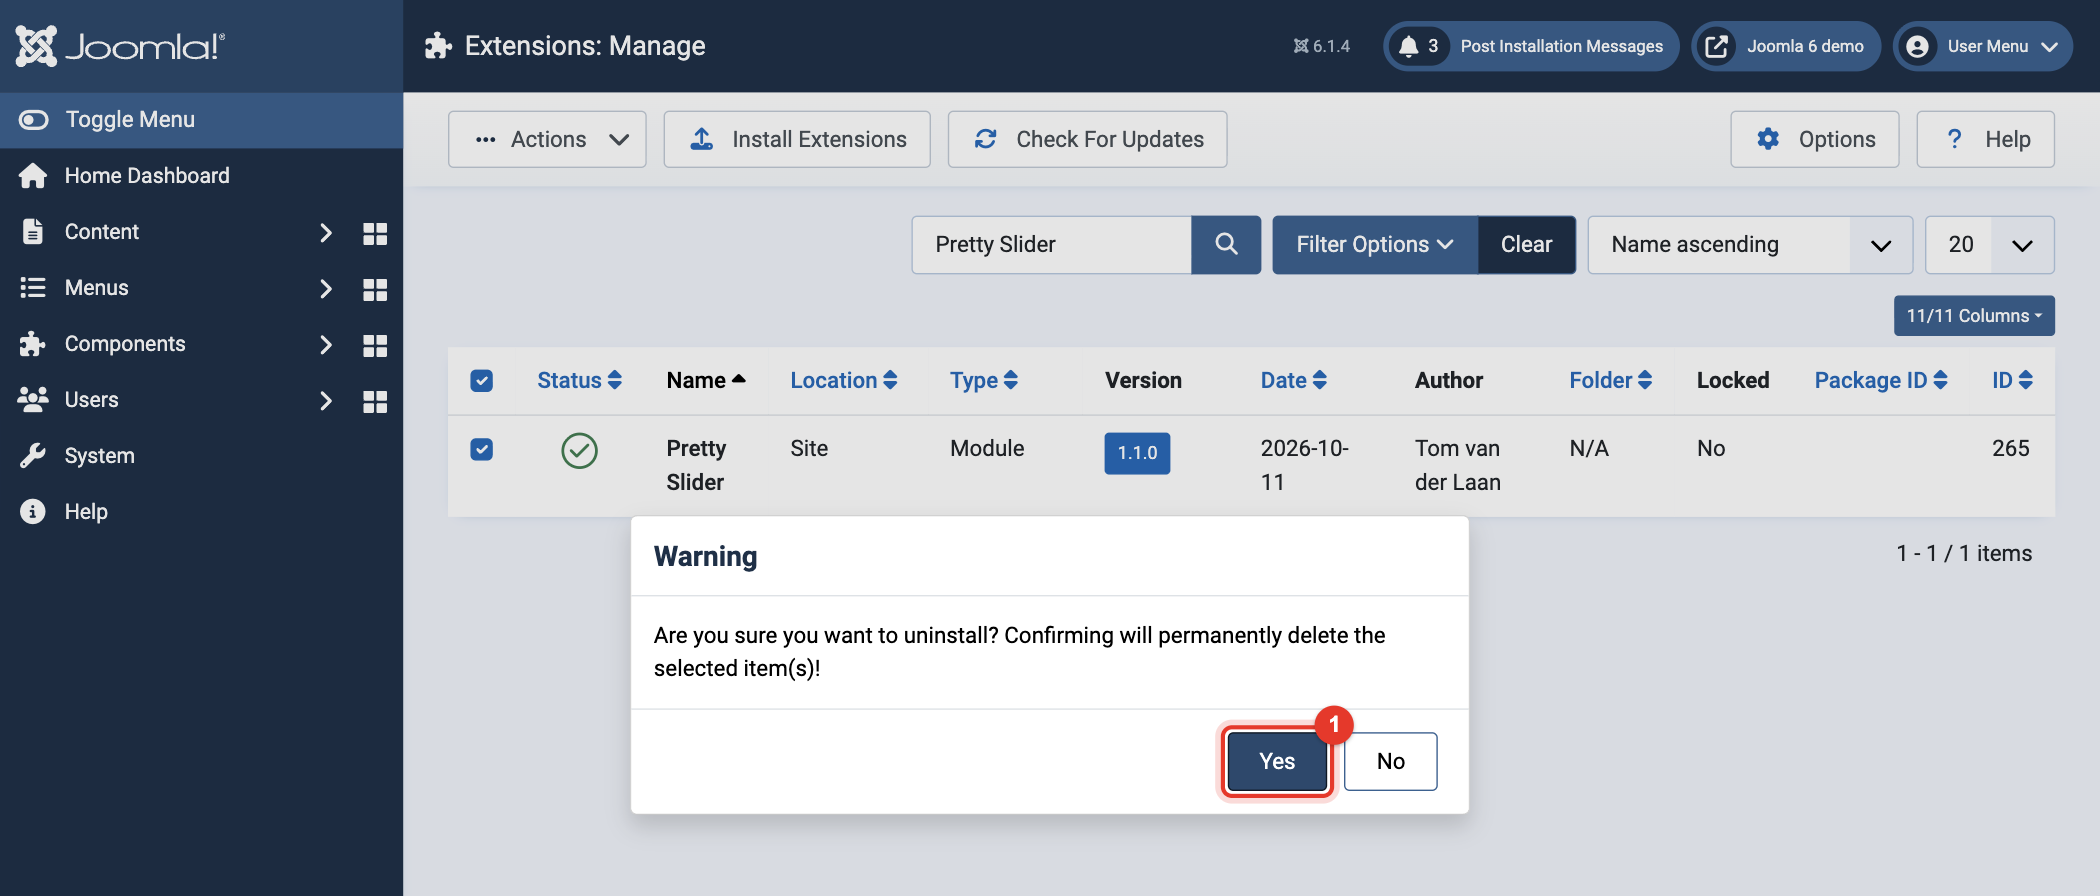
- Joomla asks whether you are sure. Click Yes (1).
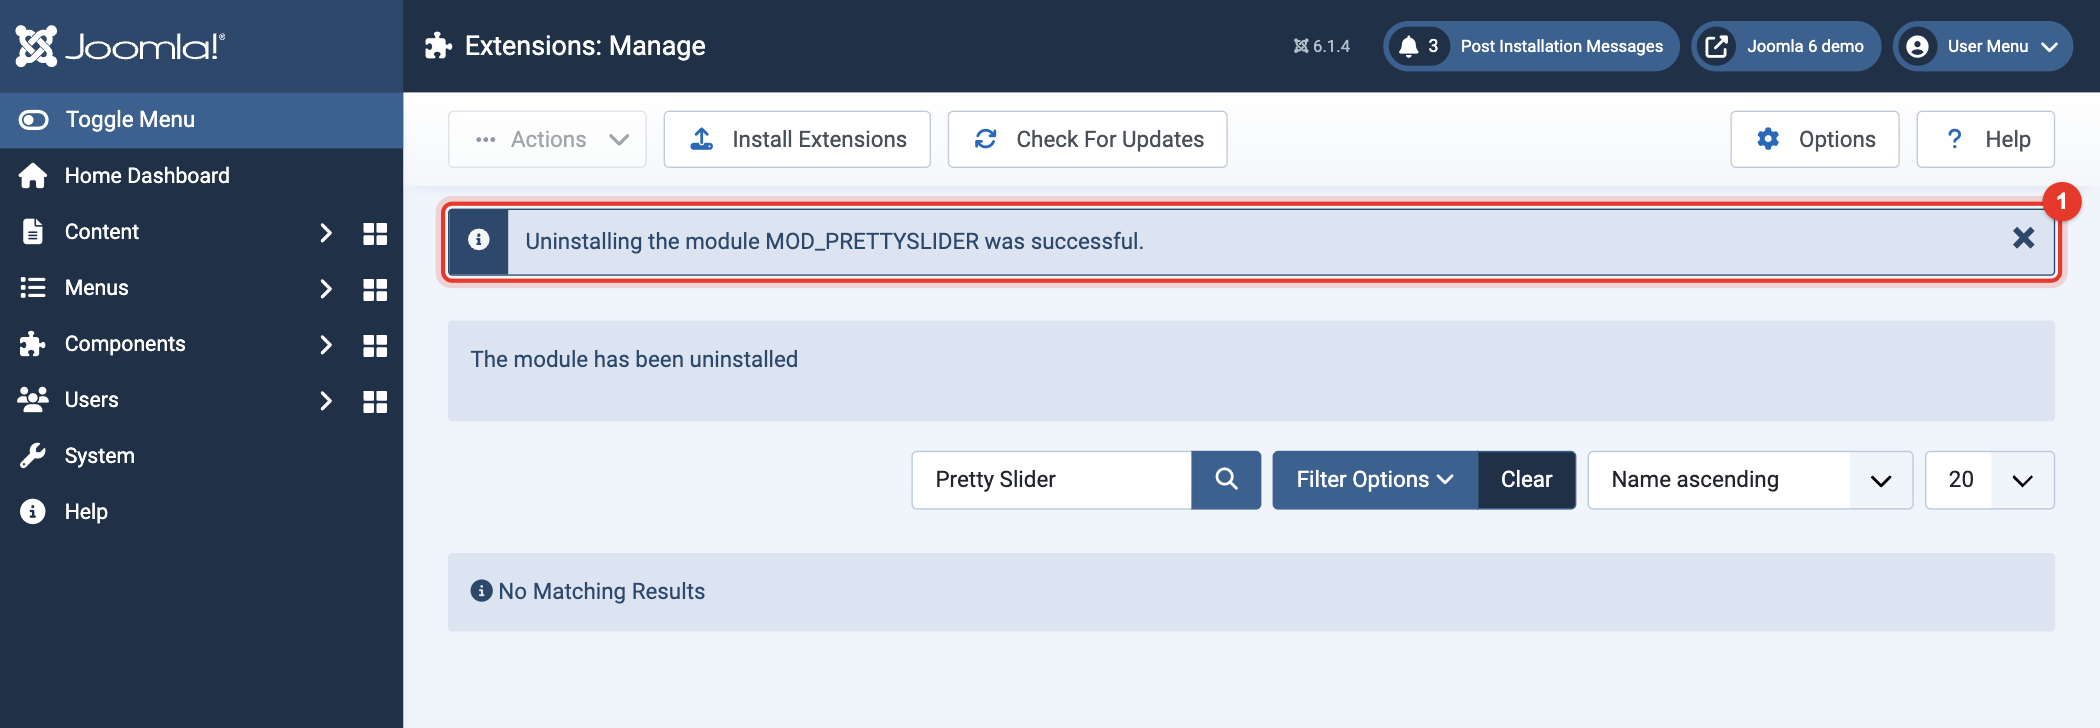
- The extension is removed. A message confirms that uninstalling the module was successful (1).
If you run into a problem, let us know with the button below. This is the only way we can improve this extension.
Report problem























